Internal Linking for SEO: A Beginner’s Guide to Connecting Your Website

Internal linking for SEO is not a matter of adding as many links as possible. A useful internal link connects two pages because the destination helps the visitor continue a task, answer a related question, or evaluate an appropriate product or service. When those connections follow a clear plan, they also make important pages easier for search engines to discover and understand.

You can improve internal linking without redesigning your website or changing its code. Start by identifying priority pages, mapping logical paths between related content, and reviewing links whenever you publish or update a page. The objective is a structure that supports both navigation and business goals without forcing irrelevant links into the content.

What Is Internal Linking for SEO?

An internal link points from one page on your website to another page on the same website. Menu items, breadcrumbs, category navigation, related-article modules, and contextual links inside paragraphs are all examples. Contextual links are especially useful because the surrounding sentence can explain why the destination is relevant.

Internal linking differs from external linking, which sends visitors to another domain. It also differs from a sitemap. A sitemap can help search engines discover URLs, but it does not provide visitors with a normal navigation path or explain how two pages are related.

For an internal link to work as intended, it should use a standard link element with a valid destination. Google advises using crawlable links and explains that relevant link text helps people and search systems understand the destination.

If you are new to the discovery process, read how search engines crawl, index, and rank pages. Internal links mainly support discovery and interpretation. They do not guarantee that a linked page will be indexed or achieve a particular position.

How Internal Links Support Discovery and Navigation

They give visitors a sensible next step

A visitor rarely needs every page on a website. They need the next page that matches their current intent. Someone reading an introductory guide may benefit from a detailed tutorial. A shopper comparing options may need a category page. A potential client reading about a problem may be ready to review the relevant service.

Good internal linking reduces the need to return to the menu or use site search. It creates a guided path while still allowing the visitor to decide whether to follow it.

They help search engines find connected pages

Search engines use links to discover URLs and interpret relationships between pages. Google recommends ensuring that every page you care about can be reached through a link from another discoverable page. It also notes that website navigation and cross-page links can affect how an ecommerce structure is understood.

This does not mean every page should link to every other page. A dense network of unrelated links can make navigation harder and weaken the clarity of the structure. Relevance matters more than raw link volume.

Plan a Simple Website Link Structure

A useful structure moves from broad pages to specific pages and connects related resources at the same level. Before editing individual articles, sketch the main routes that visitors should be able to follow.

Website pages arranged in a hierarchy with links between related pages.

Use the following sequence to create a basic internal linking map:

  1. List the main sections. Include product categories, service groups, resources, support content, and other major areas.
  2. Identify detail pages. Map products to categories, services to service groups, and focused articles to broader guides.
  3. Define natural upward links. Detail pages should normally make it easy to return to the relevant category, topic, or service overview.
  4. Add useful cross-links. Connect pages that address related questions or represent logical next steps.
  5. Check the route from an established page. Important destinations should not depend solely on internal search, filters, or an XML sitemap.

For an ecommerce website, a common path is home page to category, category to subcategory, and subcategory to product. Google specifically recommends making products reachable through linked navigation rather than relying only on a search box.

For a service business, the structure may move from a broad service overview to individual service pages, supporting case studies, frequently asked questions, and contact or consultation pages. A content-led website may use pillar guides connected to narrower articles. The exact hierarchy varies, but the principle remains consistent: broad pages organize the subject, while focused pages answer specific needs.

Internal linking complements on-page SEO, while crawlability, redirects, canonical URLs, and site architecture belong within a broader technical SEO checklist. Keeping these responsibilities distinct helps you diagnose problems accurately.

Choose Pages That Should Receive More Internal Links

Do not prioritize a page only because it currently has few links. First decide whether the page is useful, current, indexable, and aligned with a real visitor need. Sending more internal links to a weak or redundant destination does not resolve the underlying content problem.

A priority destination usually combines three conditions: it matters to the business, it satisfies a recognizable user intent, and it is relevant to pages that could link to it. Examples may include an important category, a core service, a useful comparison, or an authoritative guide that supports several narrower articles.
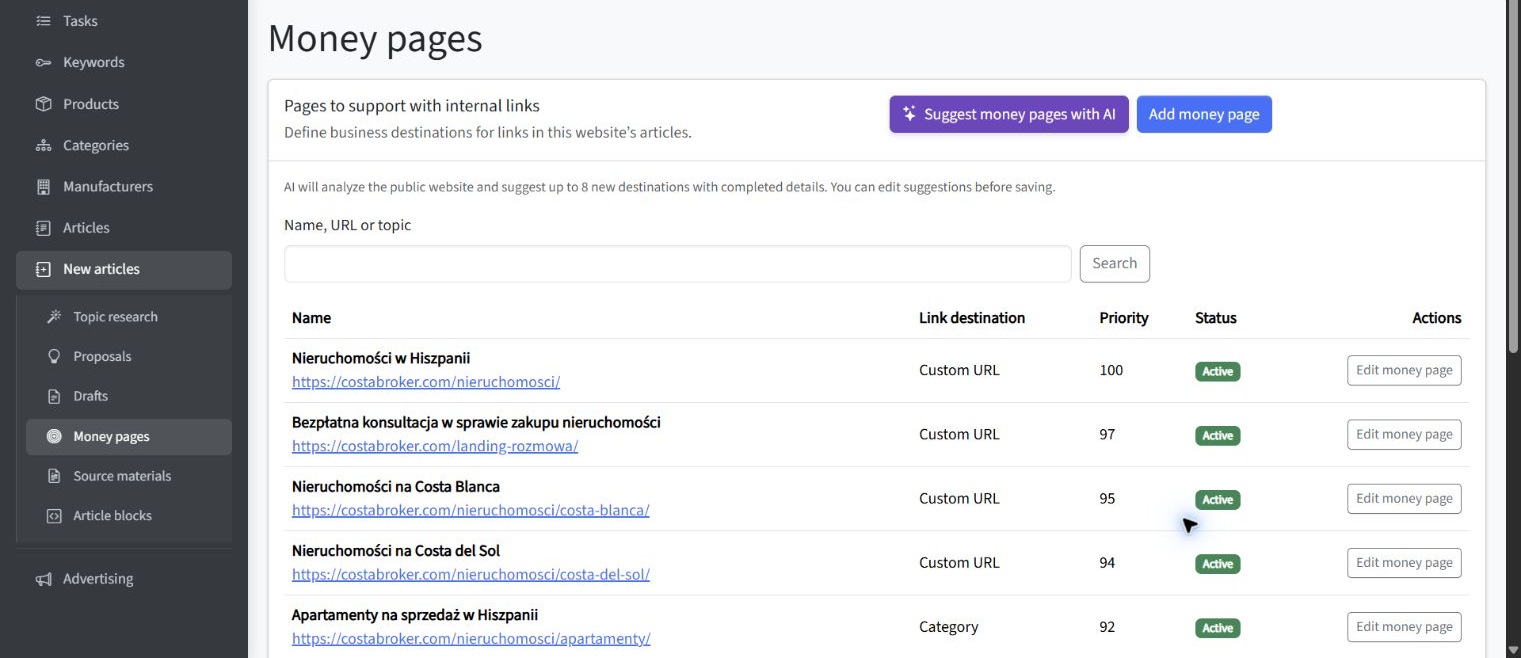
SEOAssistant: Money pages and business destinations (English interface)
SEOAssistant — Money pages and business destinations

Before adding links, evaluate each possible destination against practical criteria:

  • Business value: Does the page represent an important product area, service, lead action, or strategic topic?
  • User value: Does it help the visitor complete the next stage of research, comparison, or purchase?
  • Relevance: Can another page link to it without changing the subject or forcing an awkward sentence?
  • Page quality: Is the destination accurate, substantial, current, and ready to receive visitors?
  • Indexing intent: Is this a page you actually want search engines to find and consider for search results?

These criteria prevent internal linking from becoming a mechanical exercise. A commercially important page may deserve more visibility, but only from content where the link genuinely helps the reader.

Write Descriptive Internal Link Anchor Text

Anchor text is the visible, clickable wording of a link. It should set a clear expectation about the destination. Phrases such as click here, learn more, or this page provide little information when read outside their surrounding sentence.

Descriptive does not mean repetitive or overloaded with keywords. Google recommends concise, relevant anchor text and advises against forcing excessive keywords into links. There is also no universal ideal number of links for a page.

Compare these approaches:

  • Vague: Read more here.
  • Over-optimized: Visit our best internal linking for SEO internal links SEO guide.
  • Clear: Follow the internal linking audit checklist.
  • Contextual: Review the service options for small businesses before requesting a consultation.

The strongest version usually describes the destination in natural language while fitting the sentence. Exact-match wording is not required every time. Variation can make links easier to read while still preserving their meaning.

For examples of clear and vague link text, see Google’s guidance on writing anchor text.

Connect Articles, Categories, Products, and Services

Internal linking should connect informational content with the rest of the website, not isolate the blog as a separate area. An article can guide readers toward a category, product, or service when the destination offers a logical way to act on the information they have just read.

An article connected to relevant product, category, service, and guide pages.

Consider an ecommerce article explaining how to choose a type of craft material. The page could link to the relevant category when discussing available options and to a specific product page when describing a suitable use case. The link should appear beside the information that makes the destination useful, rather than in an unrelated promotional paragraph.
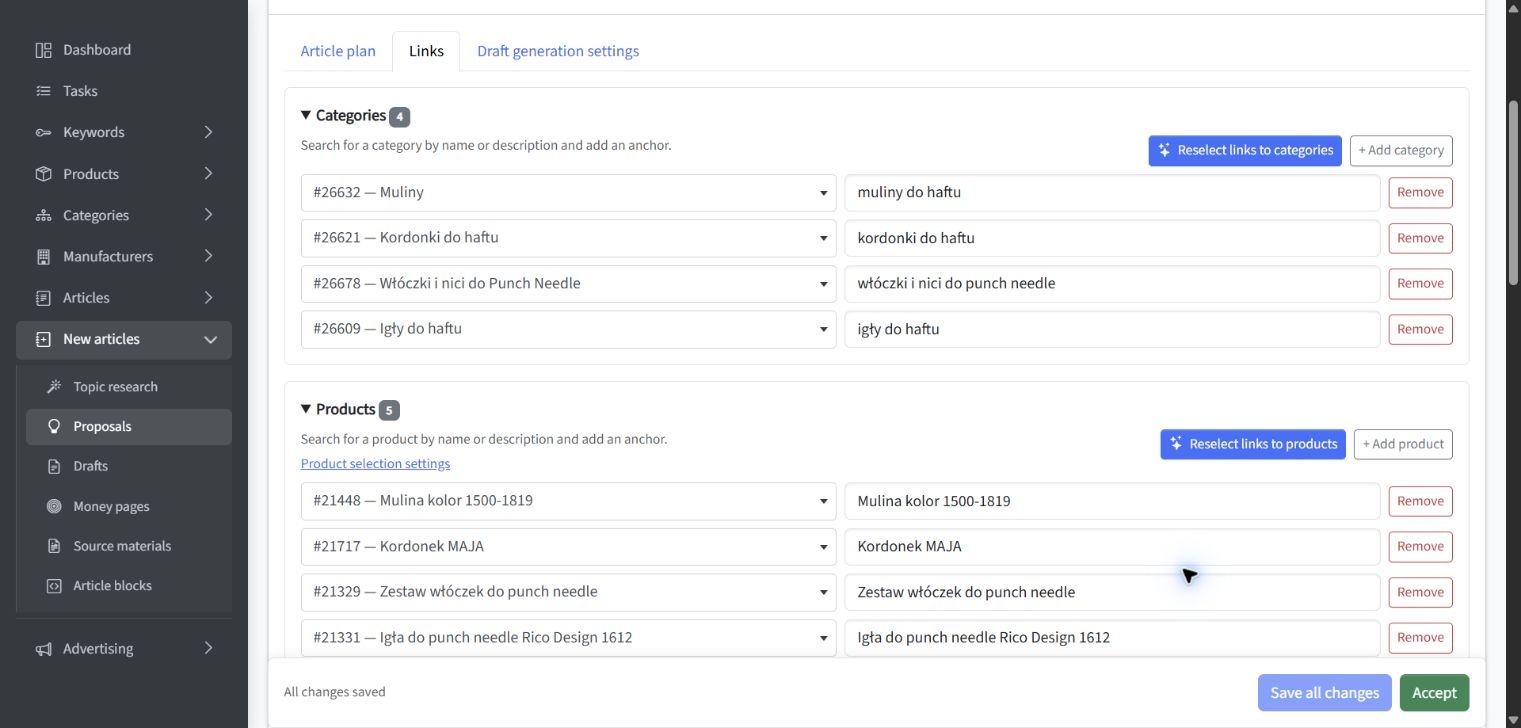
SEOAssistant: Internal links to categories and products (English interface)
SEOAssistant — Internal links to categories and products

The same principle applies to services. An article about diagnosing a business problem may link to the relevant service page after explaining when professional support becomes appropriate. The service page can link back to guides that answer preliminary questions, helping visitors move in either direction.

Useful connections commonly include:

  • articles linking to relevant categories or service pages;
  • category pages linking to buying guides and comparison content;
  • product pages linking to instructions, compatibility information, or care guides;
  • service pages linking to case studies, process explanations, and frequently asked questions;
  • broad guides linking to focused articles that explore individual subtopics;
  • related articles linking to one another when each page serves a distinct intent.

If a subject includes one broad guide and several focused resources, map each search intent to a page before connecting the guides. The objective is not to create a closed loop of links for its own sake. Each connection should help the visitor understand the subject or reach a relevant business destination.

Find and Fix Internal Linking Problems

Internal linking problems often develop gradually. New pages are published without links from older content, URLs change, categories are removed, and articles continue pointing to redirected or outdated destinations. Regular review is therefore more reliable than a one-time cleanup.

Website map showing an orphan page, a broken link, a redirect, and a deeply buried page.

Start by looking for the following issues:

  • Orphan pages: live pages with no discoverable internal links pointing to them;
  • Broken links: links leading to missing pages or invalid URLs;
  • Redirected links: internal links that still point to an old URL instead of the current destination;
  • Deep pages: important pages that require too many navigation steps to reach;
  • Irrelevant links: connections based on a shared word rather than a shared user need;
  • Weak anchor text: repeated vague labels that do not explain the destination;
  • Missing commercial connections: helpful articles that never guide qualified readers toward relevant products, categories, or services;
  • Inconsistent URLs: different internal URL versions pointing to the same content.

Google advises using consistent destination URLs in internal links and recommends direct, crawlable links with meaningful text.

If recurring content gaps and weak links between articles and commercial pages are difficult to prioritize, you can check whether SEOAssistant.pro could help with this on your website. The free assessment uses public website and search information to evaluate possible use cases and limitations. It does not automatically repair internal links; implementation, review, and publishing remain separate steps.

When a useful page has no incoming internal links, first decide whether it should remain live. If it serves a valid purpose, connect it from relevant pages and appropriate navigation. If it duplicates another page, is outdated, or no longer supports a user need, consolidation, redirection, updating, or removal may be more appropriate than adding links.

For an orphan page that still serves visitors, add a link from a related page where the reader would need it. The guide to how search engines discover pages explains why this helps. To review the rest of the site, follow the internal linking checklist below.

Create a Repeatable Internal Linking Workflow

A repeatable process is more effective than occasional bursts of link building. Assign internal linking tasks to both publication and maintenance workflows so that new pages enter the structure correctly and older content continues to support current priorities.

A practical workflow can follow these steps:

  1. Select the destination. Confirm that the page is useful, current, indexable, and strategically relevant.
  2. Find suitable source pages. Look for established articles, categories, services, or products that discuss a related need.
  3. Check the context. Read the paragraph around each proposed link and confirm that the destination is a genuine next step.
  4. Write the anchor text. Use concise wording that describes what the reader will find.
  5. Review the destination URL. Link directly to the preferred live URL rather than an old address that redirects.
  6. Approve and publish. Treat suggested links as editorial changes that require human review.
  7. Reassess after significant changes. Repeat the review after migrations, category changes, major content updates, or new product and service launches.

This process separates generation from approval. Tools can identify possible relationships and reduce repetitive work, but a person should verify relevance, wording, page quality, and business priority. A connected SEO workflow can bring analysis, prioritization, content review, controlled publishing, and measurement into one process while keeping approval with the team responsible for the website.

Common Internal Linking Mistakes to Avoid

Most internal linking mistakes come from applying a simple rule without checking context. Watch for these patterns during content reviews:

  • Adding links based only on keyword matches. Two pages can contain the same phrase while serving different needs.
  • Sending every article to the same commercial page. The destination must match the specific topic and stage of the visitor’s decision.
  • Linking every occurrence of a term. Repeated links can interrupt reading without adding navigation value.
  • Using identical anchors mechanically. Consistency is useful, but natural variation often fits the surrounding sentence better.
  • Prioritizing quantity over page quality. More links cannot compensate for an outdated, thin, or unsuitable destination.
  • Ignoring older content. Established pages may provide some of the most relevant opportunities to introduce a new resource.
  • Relying only on automated suggestions. A suggestion still requires verification before publication.

Internal linking supports SEO when it reflects a coherent website structure. It should not be treated as an isolated ranking tactic or a substitute for useful content, sound navigation, and technically accessible pages.

Key Conclusions

A beginner does not need a complex scoring model to make useful improvements. Apply a small set of consistent decision rules:

  • Make every important page reachable from another relevant, discoverable page.
  • Prioritize destinations using business value, user intent, relevance, and page quality.
  • Connect informational content with appropriate products, categories, services, and next-step resources.
  • Use descriptive anchor text that explains the destination without forcing keywords.
  • Fix orphan pages, broken links, redirected links, and inconsistent URLs before adding links at scale.
  • Review proposed links editorially rather than publishing them only because a tool suggested them.
  • Repeat the process when the website, offer, or content library changes.

The main decision is simple: add an internal link when the destination gives the reader a relevant next step and strengthens the logical connection between pages. If the link exists only to increase a count, reconsider it.

Summary

Internal linking for SEO connects website structure, visitor navigation, and content strategy. Begin with the pages that matter, identify relevant source content, write clear anchor text, and verify that each destination is worth visiting. Then make the review part of your normal publishing and maintenance process. A smaller set of deliberate, well-placed links is more useful than a large collection of connections created without context.
Google Search Console: A Complete Beginner’s Guide

Google Search Console helps you understand how Google discovers, indexes and displays your website, but simply connecting it will not improve your rankings. Its value comes from using reliable search data to identify changes, investigate problems and measure results. This Google Search Console guide explains the essential reports, the questions they answer and a practical workflow for beginners, while linking to focused instructions for more detailed tasks.

What Is Google Search Console?

Google Search Console is a Google service that reports how a website performs in Google Search. It shows information about search visibility, clicks, queries, indexing, page experience and technical issues that may affect Google’s ability to process your content. Adding a property gives you access to this information, but it does not change how Google ranks the website.

The platform is best understood as a monitoring and diagnostic tool. It helps you answer questions such as:

  • Are people finding the website through Google Search?
  • Which queries and pages generate organic clicks?
  • Has search visibility increased or declined?
  • Does Google know about the pages you want indexed?
  • Are important URLs excluded from the index?
  • Do groups of pages have Core Web Vitals problems?

These questions belong to different reports. A decline in clicks, for example, is a performance signal. A valuable page excluded by a noindex directive is an indexing problem. Keeping these categories separate makes diagnosis more reliable.

Google Search Console vs. Google Analytics

Google Search Console primarily describes what happens in Google Search before someone arrives on your website. It reports impressions, clicks, search queries and landing pages. Google Analytics measures activity on the website, including sessions, page views and user actions. The figures will not match exactly because the two systems use different metrics and counting methods.

Use Search Console to understand search discovery and visibility. Use Google Analytics to understand on-site behavior and outcomes. Reviewing both can help you connect an organic click with subsequent activity, such as a purchase, enquiry or newsletter registration.

Google Search Console vs. third-party SEO tools

Search Console provides first-party information from Google, but it is not a complete SEO management platform. Third-party tools may add competitor research, crawling, content planning, prioritization, collaboration or controlled publishing. If you are evaluating those roles, this comparison of SEO platforms and their approaches to implementing changes explains how different tool categories fit into an SEO process.

What Can You Do with Google Search Console?

Search Console turns several areas of organic search into measurable questions. Its reports help you monitor outcomes and diagnose constraints, but they do not automatically decide which business opportunity should receive attention first.

You can use Google Search Console to:

  • measure clicks, impressions, click-through rate and average position;
  • analyze performance by query, page, country, device and search appearance;
  • check which known URLs are indexed or not indexed;
  • review the reasons Google gives for excluding groups of URLs;
  • submit and monitor XML sitemaps;
  • inspect Google’s information about an individual URL;
  • test whether a live page is accessible for indexing;
  • monitor Core Web Vitals using real-user data;
  • receive notifications about certain detected issues.

The practical limitation is that data still requires interpretation. A fall in clicks may result from lower demand, lost visibility, a change in click-through rate or a problem affecting particular pages. Search Console shows evidence, not a complete explanation.

If you need to turn these insights into prioritized and reviewed website changes, a connected SEO workflow can support the process from analysis through implementation and measurement. Search Console remains the source of search and diagnostic signals, while the operational workflow helps a team decide, approve and apply the response.

Who Should Use Google Search Console?

Google Search Console for beginners is accessible enough for website owners, but its data is also useful to specialists responsible for content, development and commercial performance.

The platform is particularly relevant to:

  • website owners who need to confirm that important pages can appear in Google;
  • e-commerce managers monitoring category and product-page visibility;
  • content teams evaluating which topics, queries and articles attract search traffic;
  • SEO specialists investigating performance, crawling and indexing;
  • developers diagnosing technical conditions that affect page processing;
  • agencies reporting results and coordinating fixes with clients.

Responsibility should still be controlled. A content editor may only need reporting access, while the person managing verification and users needs owner-level permissions. Give each person enough access to complete their work without distributing unnecessary control.

How to Add and Verify Your Website

Before Search Console can display private information about a website, you must add a property and prove that you control it. For a website, the two main choices are a Domain property and a URL-prefix property.

A Domain property covers the selected domain across its subdomains and protocols. A URL-prefix property covers only addresses beginning with the exact prefix you enter, including the specified protocol and any path. Domain properties require DNS verification, while URL-prefix properties support several verification options.

A Domain property is usually useful when you want a broad view of the website. A URL-prefix property can be appropriate when you need to monitor a specific protocol, subdomain or directory separately. Some organizations create both: a Domain property for overall coverage and selected URL-prefix properties for focused analysis.

The basic process is sequential:

  1. Sign in to Search Console with the appropriate Google account.
  2. Add a new property.
  3. Choose Domain or URL-prefix coverage.
  4. Complete one of the available ownership verification methods.
  5. Confirm that the correct users have appropriate permissions.
  6. Keep the verification method in place after setup.

Verification deserves careful handling because a small error in the property definition can fragment your data. Follow the dedicated instructions to set up Google Search Console and verify your website, including the choice of property type, DNS verification and alternative URL-prefix methods.

Understanding the Google Search Console Dashboard

The Overview page summarizes important information for the selected property. Depending on the website and available data, it can include search performance, recommendations, indexing information and supported enhancements. It is a starting point rather than a substitute for opening the underlying reports.

Each major area answers a different practical question:

  • Performance: How often does the website appear in Google Search, and what generates clicks?
  • Page indexing: Which known pages are indexed, and why are others not indexed?
  • Sitemaps: Can Google process the submitted sitemap files?
  • URL Inspection: What does Google know about one specific URL?
  • Core Web Vitals: Do groups of pages provide a good loading, responsiveness and visual stability experience?
  • Enhancements: Has Google detected supported structured features and related issues?

Always check the property selector before interpreting a report. Data from an HTTP property, an HTTPS property, one subdomain or one directory may represent only part of the website.

How to Measure Search Performance

The Search results Performance report shows four central metrics: clicks, impressions, CTR and average position. You can group or filter the information by dimensions including queries, pages, countries, devices, search appearance and dates.

  • Clicks indicate how often a user clicked from Google Search to your property.
  • Impressions indicate how often a result connected with your property was displayed under Google’s counting rules.
  • CTR is clicks divided by impressions.
  • Average position summarizes the position of the topmost relevant result for the selected grouping and should not be treated as a fixed daily ranking.

Analyze trends before isolated values. Compare equivalent periods, consider seasonality and check whether a decline affects the entire property, one page type or only a small group of queries. Recent preliminary data may still change, so avoid drawing strong conclusions from an incomplete period.

A useful beginner analysis starts with the Pages tab to find gains and losses, then moves to Queries to understand which searches contributed to the change. Filters for device, country and search type can reveal whether an apparent sitewide trend is actually limited to one segment.

For detailed instructions on comparisons, filters and opportunity analysis, see how to use the Google Search Console Performance report.

Optional example: Search Console data summarized in SEOAssistant

The following application screenshot is an optional example of page-level Search Console data summarized inside SEOAssistant. It is not the native Google Search Console interface. The view compares clicks, impressions, CTR and average position between periods and supports filtering by page type, growth opportunities, declines and robots.txt status.

SEOAssistant: Google Search Console page performance (English interface)
SEOAssistant — Google Search Console page performance

This type of consolidated view can help organize a review, but the interpretation still matters. A page with declining clicks should not be changed until you check impressions, relevant queries, seasonality, indexing status and recent website modifications.

How to Check Whether Google Can Index Your Pages

The Page indexing report provides a sitewide view of URLs Google knows about and separates indexed URLs from URLs that are not indexed. The report also groups non-indexed URLs by reason, helping you identify whether a condition is intentional or requires investigation.

Not indexed does not automatically mean broken. Redirects, duplicate URLs, alternate pages and deliberately excluded content may have no reason to appear independently in search results. The priority is to identify valuable canonical pages that should be indexed but are not.

When reviewing the report, ask these questions:

  • Does the affected group contain pages intended for organic search?
  • Are the URLs canonical, accessible and returning successful responses?
  • Is a robots.txt rule or noindex directive preventing access or indexing?
  • Does the issue affect one URL or a shared page template?
  • Did the number of affected pages change after a release or migration?

Investigate patterns before individual examples. If hundreds of affected URLs use the same template, solving the shared cause is usually more effective than requesting indexing for each page. The focused guide explains how to understand and troubleshoot the Indexing report without treating every excluded URL as an SEO error.

How Sitemaps Help Google Discover Your Content

An XML sitemap is a structured file that identifies pages and other files you consider important. It can help Google discover content, particularly on large, new or complex websites, but submission remains a hint. It does not guarantee that every listed URL will be crawled, indexed or ranked.

A useful sitemap should generally contain the canonical, indexable URLs you want to appear in search results. Including redirected, blocked, duplicate or non-indexable addresses creates conflicting signals and makes sitemap monitoring less informative.

The Sitemaps report helps you check whether Google could retrieve and process a submitted file. This is distinct from page indexing. A successfully processed sitemap can still contain URLs that Google decides not to index.

Use the dedicated tutorial to submit a sitemap in Google Search Console, interpret its status and troubleshoot fetching or processing errors.

How to Inspect an Individual URL

The URL Inspection tool shows what Google knows about a specific page. Its default indexed view reflects information held in Google’s systems, while Test Live URL checks the current version against several requirements for appearing in Google. The live test does not replace the indexed view because the two views answer different questions.

Use URL Inspection when you need to:

  • confirm whether a particular URL is indexed;
  • review crawl and indexing information;
  • compare the user-declared canonical with Google’s selected canonical;
  • test whether a corrected live page is accessible;
  • request indexing after publishing or making a meaningful update.

An indexing request places the URL into a processing queue, but it does not guarantee inclusion in the index. Repeated requests are not a substitute for fixing accessibility, canonicalization, content or quality problems. For numerous URLs, a sitemap and a sitewide diagnosis are more appropriate.

The complete walkthrough explains how to inspect individual URLs in Google Search Console and distinguish Google’s indexed information from the current live page.

How to Monitor Core Web Vitals and Page Experience

The Core Web Vitals report uses real-user field data and organizes similar URLs into groups. It reports three metrics: LCP for loading performance, INP for responsiveness and CLS for visual stability. Groups are classified as Good, Need improvement or Poor for mobile and desktop data.

The report is useful for finding shared experience problems, but it is not a complete technical performance audit. Some URLs may be absent because there is not enough field data, and an example URL represents a broader group that may share the same template or components.

A sensible investigation process is:

  1. Identify the affected metric, device type and URL group.
  2. Open representative URLs from the group.
  3. Use page-level diagnostic tools to investigate likely causes.
  4. Fix the shared template, component or delivery problem.
  5. Test the change before releasing it widely.
  6. Start validation and monitor the group over time.

Passing Core Web Vitals can support a better user experience, but it does not guarantee higher rankings. Review the detailed guide to review Core Web Vitals in Google Search Console and understand how field data, URL grouping and validation work.

A Simple Weekly Google Search Console Workflow

You do not need to react to every daily movement. A repeatable weekly review is usually more useful because it separates routine monitoring from urgent investigation. Use comparable date ranges and document important changes so that future movements have context.

  1. Check notifications and the Overview page. Look for new issues or unexpected changes.
  2. Review total clicks and impressions. Compare the latest complete period with an equivalent previous period.
  3. Open the Pages tab. Identify landing pages with meaningful gains or losses.
  4. Review relevant queries. Determine whether demand, visibility or CTR appears to be changing.
  5. Check indexing trends. Focus on unexpected increases in non-indexed valuable pages.
  6. Review sitemap processing. Confirm that important sitemap files remain accessible.
  7. Inspect selected URLs. Use URL Inspection for new, updated or problematic pages.
  8. Check experience signals. Look for new Core Web Vitals groups requiring investigation.
  9. Record decisions. Assign each verified issue an owner, priority and next action.

The workflow should produce decisions, not merely observations. A drop affecting one unimportant page may require no action, while a new indexing problem across a high-value template may deserve immediate escalation.

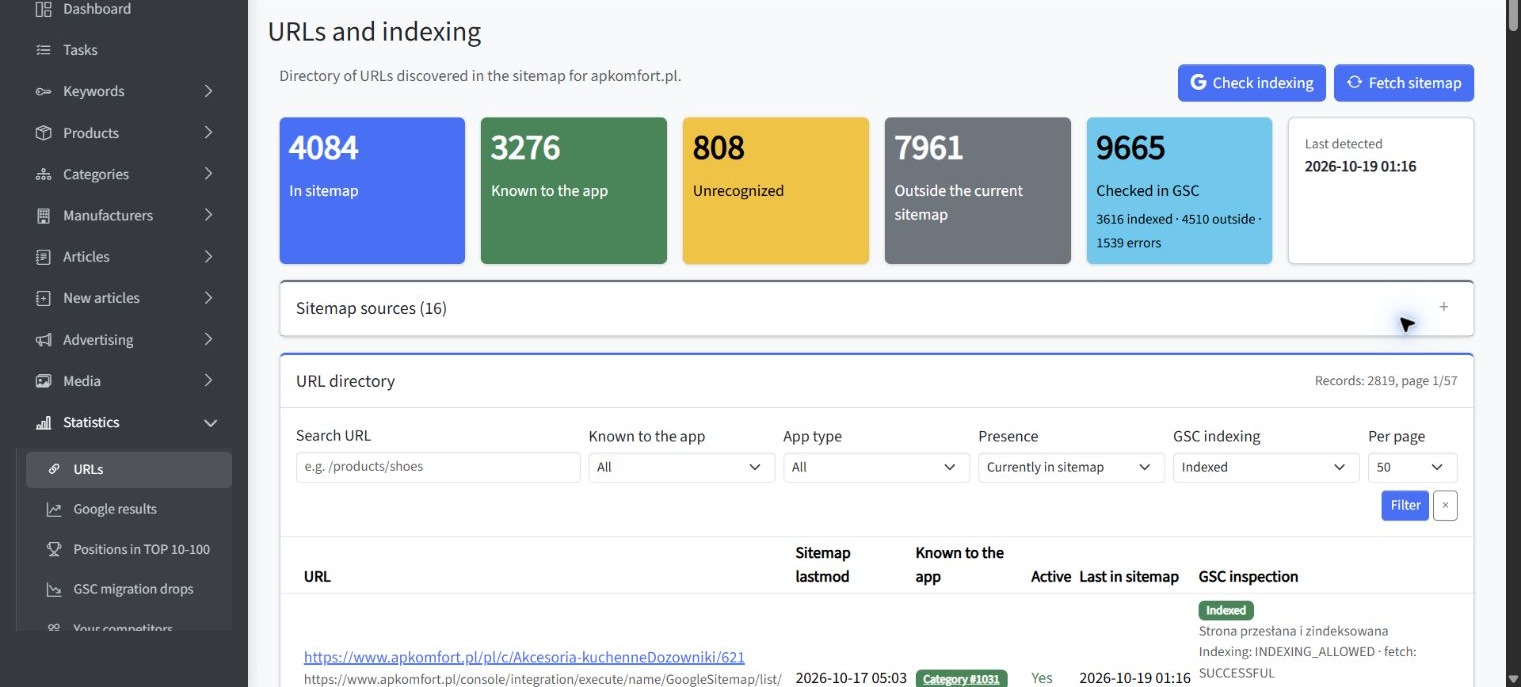
Optional example: consolidated sitemap and indexing review

The following SEOAssistant screenshot illustrates an optional consolidated review using Google Search Console data. It is not the native Search Console interface. The view can organize URLs by page type, sitemap presence and inspection status, making it easier to compare sitemap coverage with indexing information.

SEOAssistant: Sitemap URLs and indexing status (English interface)
SEOAssistant — Sitemap URLs and indexing status

A consolidated view can accelerate triage, but it should not replace verification in the relevant Search Console report. Use it to identify a pattern, then inspect the affected group and confirm the technical cause before approving changes.

Common Beginner Mistakes to Avoid

Most early mistakes come from treating one metric as a conclusion. Search Console data becomes more useful when you compare reports, validate assumptions and distinguish visibility from technical eligibility.

  • Expecting setup to improve rankings. Search Console provides information and controls, not an automatic ranking boost.
  • Choosing the wrong property. An incomplete URL-prefix can omit protocols, subdomains or directories you intended to monitor.
  • Reading average position as a fixed rank. It is an aggregated metric affected by the selected dimensions and context.
  • Assuming every non-indexed URL is a problem. Many exclusions are intentional or appropriate.
  • Assuming sitemap submission guarantees indexing. A sitemap supports discovery but does not force Google to include a page.
  • Using URL Inspection for sitewide monitoring. It diagnoses individual URLs; grouped issues belong in the Page indexing report.
  • Reacting to one day of data. Short-term movements can reflect incomplete data, normal variation or changing demand.
  • Changing pages without recording the change. Without implementation dates, later comparisons are difficult to interpret.
  • Attributing a result to one action without evidence. Search performance can change for several simultaneous reasons.

The corrective principle is simple: begin with a trend, narrow it to a page or URL group, verify the relevant report and only then choose an action.

Frequently Asked Questions About Google Search Console

Is Google Search Console an SEO tool?

Yes, but its role is specific. It provides first-party Google Search performance data, indexing information and diagnostics. It does not replace crawling software, analytics, competitor research, content planning or implementation controls.

Does Google Search Console improve rankings?

No. Adding and verifying a property does not directly change rankings. The platform helps you identify opportunities and problems, but improvement depends on the quality and relevance of the actions you take.

How long does it take for data to appear?

A newly verified property may not immediately contain complete information. Availability depends on the report and whether Google has enough relevant data. Confirm that you selected the correct property before assuming collection has failed.

Why are Search Console clicks different from Analytics sessions?

A click and a session are not the same event, and the platforms process information differently. Differences are therefore expected. Compare trends and investigate large unexplained gaps rather than trying to force exact equality.

Should every page on my website be indexed?

No. Administrative pages, duplicates, filtered URLs and other low-value or intentionally excluded addresses may not need independent indexation. Focus on whether valuable canonical pages intended for search are eligible and indexed.

Is a sitemap required?

Google can often discover a well-linked website without one, but a sitemap can improve discovery for large, new, complex or media-heavy sites. It also provides a useful monitoring point in Search Console.

How often should I check Search Console?

A weekly review is a practical starting point for an actively managed website. Check it additionally after major releases, migrations, template changes or unexpected organic traffic movements. Google also recommends monitoring after site changes and paying attention to issue notifications.

Key Takeaways from This Google Search Console Guide

The main conclusions for a beginner are:

  • Google Search Console measures search performance and provides indexing and experience diagnostics.
  • It complements Google Analytics and third-party SEO tools rather than replacing them.
  • Property selection determines which parts of the website your reports cover.
  • The Performance report explains visibility and clicks, while indexing reports explain technical eligibility.
  • Not every excluded URL requires a fix.
  • Sitemaps help discovery but do not guarantee indexing.
  • URL Inspection is designed for individual pages, not bulk monitoring.
  • Core Web Vitals data should lead to template-level investigation where appropriate.
  • Reliable decisions require comparison, verification and documented implementation.

The central distinction is between activity and outcome. Opening reports, submitting URLs and exporting data are activities. The useful outcome is a verified decision about what should be fixed, improved, monitored or deliberately left unchanged.

Summary: How to Use Google Search Console Effectively

For beginners, the best way to use Google Search Console is to assign each report a clear question. Use Performance to understand search visibility, Page indexing to identify coverage problems, Sitemaps to monitor discovery files, URL Inspection to diagnose individual pages and Core Web Vitals to detect shared experience issues.

Start with correct property setup, establish a weekly review and investigate patterns before changing the website. Search Console will not perform SEO for you, but it gives you evidence that can make SEO decisions more controlled, measurable and accountable.

How to Set Up Google Search Console and Verify Your Website

Setting up Google Search Console involves more than entering your website address. The property type determines which URLs are included, while the verification method determines how Google confirms your authority to access sensitive search data. This guide explains how to set up Google Search Console, verify your website, grant appropriate access, and confirm that data collection is working.

If you are new to the platform and want broader context before starting, read this complete beginner’s guide to Google Search Console. Adding a property does not change how your website appears in Google Search. It gives you access to reporting and diagnostic tools for the property you verify. See Google Search Console Help.

What You Need Before Setting Up Google Search Console

You need a Google Account to use Search Console. You also need sufficient access to verify that you control the website. The required access depends on the verification method you choose. See Google Search Console Help.

Before you add a website to Google Search Console, prepare the following:

  • A Google Account: Preferably use an account owned and controlled by the business rather than a temporary contractor.
  • Your correct website address: Include the protocol and subdomain if you plan to create a URL-prefix property.
  • DNS access: This is required when creating a Google Search Console Domain property.
  • Website administration access: You need this for HTML file or HTML tag verification.
  • Relevant Analytics or Tag Manager permissions: These are required if you want to use an existing installation for verification.

It is also worth deciding who should remain responsible for the property. A business should retain at least one verified owner whose account will remain available if an employee, agency, or developer leaves.

Domain Property vs. URL-Prefix Property

The most important setup decision is whether to create a Google Search Console Domain property or a Google Search Console URL-prefix property. The difference concerns coverage, not the amount of authority or ranking influence provided by the account.

Google Search Console Domain property

A Domain property includes the specified domain across its subdomains, protocols, and paths. For example, a property entered as example.com can include the HTTP and HTTPS versions, as well as addresses using subdomains such as www, shop, or support. You enter the domain without a protocol or path. Domain properties require DNS verification. See Google Search Console Help.

A Domain property is usually the practical choice when you control the domain and want a consolidated view of the whole website. You can still create additional URL-prefix properties later if a team needs a separate view of a particular protocol, subdomain, or directory.

Google Search Console URL-prefix property

A URL-prefix property covers only URLs beginning with the exact address you enter. The protocol is significant. A property created for https://example.com/ does not automatically include http://example.com/ or https://www.example.com/. A URL-prefix can also include a path, allowing you to monitor a defined section such as https://example.com/store/. See Google Search Console Help.

This option is useful when you cannot edit DNS records, need to isolate a particular site section, or want to use verification methods such as an HTML file, HTML tag, Google Analytics, or Google Tag Manager.

Which property type gives you the right coverage?

Use a Domain property when you need complete domain-wide coverage and have DNS access. Use a URL-prefix property when you need narrower reporting, path-level separation, or more flexible Google Search Console verification methods. For many businesses, a Domain property serves as the primary property, while selected URL-prefix properties provide operational views for specific teams.

How to Add a Property to Google Search Console

To add a website to Google Search Console, sign in with the Google Account that should own or manage the property. Adding the property starts the setup process, but you will not have normal access to its data and tools until ownership is verified. See Google Search Console Help.

Follow these steps in order:

  1. Open Google Search Console and sign in.
  2. Open the property selector in the main navigation.
  3. Select Add property.
  4. Choose Domain or URL prefix.
  5. Enter the domain or URL in the required format.
  6. Continue to the verification instructions shown for that property.

For a Domain property, enter only the domain or relevant subdomain without http://, https://, or a directory path. For a URL-prefix property, enter the complete prefix exactly as it is used by the live website. A mismatch involving HTTPS, www, or another subdomain can produce an incomplete property with little or no relevant data. See Google Search Console Help.

How to Verify a Domain Property with a DNS Record

DNS verification proves that you control the domain. It is the required verification approach for a standard Domain property. Search Console may offer an automated flow for supported DNS providers or provide a record that you must add manually. See Google Search Console Help.

To complete Domain property verification manually:

  1. Copy the DNS verification record provided by Search Console.
  2. Sign in to the service that manages your domain’s DNS records.
  3. Open the DNS management area for the correct domain.
  4. Add the TXT record, or the CNAME record when instructed by the verification flow.
  5. Use the host and value fields exactly as directed by Search Console and your DNS provider.
  6. Save the DNS change.
  7. Return to Search Console and select Verify.

Google commonly provides a TXT record. Depending on the DNS interface, the host or name field for a root domain may be blank or represented by an @ symbol. Do not improvise if the interface uses different terminology. Follow the instructions for that DNS provider and copy the verification value without modifying it. See Google Search Console Help.

Manual DNS changes are not always visible immediately. Google advises that a newly added record may take up to two or three days to be served by the provider. If the record is correct but verification fails, wait and try again before replacing it. See Google Search Console Help.

Do not remove the verification record after setup. Search Console may periodically confirm that the token still exists. Removing the DNS record can cause the verified owner to lose access. See Google Search Console Help.

How to Verify a URL-Prefix Property

A URL-prefix property supports several verification methods. The best option depends on the access you already have and whether the verification token can remain in place permanently.

HTML file verification

Search Console provides a unique file that you upload to the location specified in the verification instructions, normally the root directory of the URL-prefix property. The file must be publicly accessible without authentication, and its name and contents must not be changed. Search Console does not follow redirects when looking for this verification file. See Google Search Console Help.

This method is suitable when you can upload files directly to the live website. Confirm that the exact file URL works in a private or incognito browser window before selecting Verify. Leave the file in place after verification.

HTML tag verification

The HTML tag method provides a unique meta tag that must be placed within the head section of the publicly accessible homepage used by the property. After publishing the change, inspect the live page source to confirm that the exact tag is present. See Google Search Console Help.

This method is often convenient for content management systems that let you add site verification tags without uploading files. However, theme replacements, template updates, and plugin changes can remove the tag. Keep a record of where it was added and check it after major website changes.

Google Analytics verification

You can verify a URL-prefix property with an eligible Google Analytics installation when the supported tracking code is present in the required location on the homepage. You must use the same Google Account for Search Console and Analytics, and that account must have the necessary Analytics permissions. This method is not available for Domain properties. See Google Search Console Help.

Using Analytics for verification does not combine Google Analytics and Search Console into one reporting system. The existing Analytics tag is being used as proof of access.

Google Tag Manager verification

Google Tag Manager verification can be used when the required container code is correctly installed and your Google Account has Publish or Admin permission for that container. You must sign in to Search Console with the same account that has the required Tag Manager access. This method applies to URL-prefix properties, not Domain properties. See Google Search Console Help.

Verification may fail if the container is missing from the homepage, installed in the wrong location, modified, unpublished, or associated with another account.

DNS verification for a URL-prefix property

You may also use a domain provider verification method for a URL-prefix property. This can provide a durable ownership signal when you have DNS access, although creating a Domain property may be more efficient if your objective is to monitor every protocol and subdomain. See Google Search Console Help.

Which Verification Method Should You Choose?

The right choice balances coverage, access, and durability. Select a method that proves legitimate control and is unlikely to disappear during routine website maintenance.

Use the following decision rules:

  • Choose DNS verification when you control the domain and want durable, domain-wide coverage.
  • Choose an HTML file when you have direct access to the website’s root directory.
  • Choose an HTML tag when you can safely edit the homepage head section or use a reliable site settings field.
  • Choose Google Analytics when the correct tag is already present and your account has the required permission.
  • Choose Google Tag Manager when the container is already installed and you have Publish or Admin access.

Avoid installing Analytics or Tag Manager solely to simplify Search Console verification if you do not otherwise need those tools. DNS, an HTML file, or an HTML tag may create a more direct and maintainable setup.

Google also allows additional verification methods to be added. A backup method can reduce the risk of losing access if a template change removes a tag or file-based verification token. See Google Search Console Help.

How to Give Other Users Access

Do not share one Google Account among employees, agencies, and developers. Search Console lets an owner grant individual access through Settings and Users and permissions. Only property owners can add or remove users. See Google Search Console Help.

Choose the lowest permission level that allows each person to do their work:

  • Owner: Has full control, including the ability to manage users, settings, data, and tools. A verified owner proves ownership with a token, while a delegated owner receives owner status from another owner.
  • Full user: Can view all data and perform selected actions but cannot manage ownership in the same way as an owner.
  • Restricted user: Has basic viewing access to most data and is appropriate when a person only needs limited reporting visibility.

Owner access should be limited to people who are accountable for the website and its search presence. Full user access is often suitable for SEO specialists and operational team members, while restricted access may be enough for stakeholders who only review results. Google defines these roles by the actions each user can perform, so check permissions before assigning responsibility for a task. See Google Search Console Help.

How to Confirm Google Search Console Is Collecting Data

After successful verification, select the correct property and open its Overview and Performance areas. Search Console starts collecting data when a property is added, even before verification, but it can take several days for data to accrue and appear. See Google Search Console Help.

Use this initial check:

  1. Confirm that the property name matches the intended domain, protocol, subdomain, and path.
  2. Open the Overview page and check whether report summaries are becoming available.
  3. Open the Search results Performance report and look for impressions or clicks.
  4. Check the Page indexing report to see whether Google knows about URLs within the property.
  5. Allow several days before treating an empty report as a setup failure.

The absence of performance data does not necessarily mean verification failed. A new or low-visibility website may not yet have generated measurable Google Search impressions. If reports remain empty, verify that you did not create an HTTP property for an HTTPS website or omit the subdomain used by the live site. See Google Search Console Help.

Recent Performance data may also be preliminary and can change while processing is completed. Use the verification status and correct property definition as your first setup checks rather than relying on one recent data point. See Google Search Console Help.

How to Fix Common Google Search Console Verification Problems

Most verification failures result from a mismatch between the selected property, the token location, or the permissions of the signed-in account. Work through the setup logically instead of repeatedly creating new properties.

The DNS record cannot be found

Confirm that the record was added to the authoritative DNS provider for the correct domain. Check the record type, host, and value for copying errors. If everything is correct, allow time for the provider to publish the change before trying again. See Google Search Console Help.

The HTML file is unavailable

Open the precise file address shown by Search Console in an incognito window. The file must not require a login, and its name and contents must remain unchanged. Because file verification does not follow redirects, the verification file must be accessible at the specified URL itself. See Google Search Console Help.

The HTML tag is not detected

Confirm that the exact verification tag appears in the head section of the live homepage. Check the page source rather than assuming that a content management system saved or published the change correctly. Also verify that Search Console is checking the final public homepage reached by an unauthenticated visitor. See Google Search Console Help.

Analytics or Tag Manager verification fails

Check that you are using the same Google Account in both services. Confirm that the account has the required permission and that the expected tag or container is present in the correct location on the public homepage. A tag injected only after consent or through an unsupported implementation may not be available in the form expected during verification. See Google Search Console Help.

Verification worked and then disappeared

Check whether someone removed a DNS record, HTML file, meta tag, Analytics code, or Tag Manager container. Website migrations and template replacements are common points of failure. Keep verification tokens in place unless you intentionally want to revoke the corresponding owner’s access. See Google Search Console Help.

What to Do Immediately After Verification

Verification gives you access, but it does not guarantee that Google will crawl, index, or rank every page. Complete a short setup review before moving into detailed analysis.

Your post-verification checklist should include the following actions:

  • Confirm that the property covers the intended protocols, subdomains, and directories.
  • Keep the primary verification token in place and consider adding a backup method.
  • Add users individually and assign the minimum appropriate permission.
  • Review the Overview page for security issues, manual actions, indexing information, and important notifications.
  • Check that the website’s important pages are represented within the selected property.
  • Prepare and submit your sitemap after verification.
  • Record who controls the Google Account, DNS access, and verification implementation.

This checklist separates account setup from SEO outcomes. Search Console provides evidence about Google Search visibility and technical status, but it does not directly improve rankings merely because a property has been verified.

Key Conclusions

The setup is reliable when property coverage, verification control, and user permissions are treated as connected decisions rather than separate administrative tasks.

  • A Domain property covers protocols and subdomains, while a URL-prefix property covers only the exact entered prefix.
  • DNS is required for Domain property verification and is generally the strongest option for complete domain coverage.
  • HTML file, HTML tag, Google Analytics, and Google Tag Manager methods are available for eligible URL-prefix properties.
  • Verification records and tokens should remain in place after setup.
  • Owner access should be limited, with full or restricted permissions used for other team members where appropriate.
  • Data can take several days to appear, and an empty report may reflect limited search activity or an incorrectly defined URL-prefix.

Summary

To understand how to set up Google Search Console, begin with the scope you need. Choose a Domain property for consolidated coverage when you control DNS, or choose a URL-prefix property when you need a specific segment or a more accessible verification method. Add the property, complete verification without modifying the supplied token, and keep that token active.

After you verify your website with Google Search Console, confirm the property definition, assign user permissions carefully, allow time for reporting data to appear, and complete the post-verification checklist. This creates a stable foundation for monitoring search performance, indexing, and technical issues without confusing successful account setup with guaranteed search visibility.

How to Use the Google Search Console Performance Report

The Google Search Console Performance report can show whether organic visibility is improving, but the headline numbers are only the starting point. A rise in impressions does not automatically mean rankings improved, and a lower click-through rate does not always indicate a weak title. Useful analysis requires you to compare equivalent periods, apply the right dimensions, and interpret clicks, impressions, CTR, and position together. If you are new to the platform, begin with the Google Search Console beginner’s guide before working through the process below.

What the Google Search Console Performance Report Shows

The Google Search Console Performance report explains how your property appears and receives clicks in Google Search. Its main chart tracks total clicks, total impressions, average CTR, and average position over the selected period. The table then lets you group that data by queries, pages, countries, devices, search appearance, and dates.

Each dimension answers a different question. Queries reveal what people searched for, while Pages show which URLs appeared in the results. Country and Device help you identify audience-specific differences. Search appearance separates supported result formats when your property has relevant data.

The report measures organic Google Search activity rather than all website traffic. It should therefore be used alongside analytics, conversion, revenue, and business data. Search Console can tell you that clicks changed, but it cannot tell you by itself whether those visits produced valuable outcomes.

Clicks, Impressions, CTR, and Average Position Explained

Clicks

Clicks count qualifying interactions that take a user from a Google Search result to your website. Use clicks to measure the traffic delivered by Search, but remember that a click is not the same as a session, lead, or sale. Google Search Console and analytics platforms use different collection and processing methods, so their numbers should not be expected to match exactly.

Impressions

Impressions indicate how often a link to your property was shown in Google Search under the counting rules for the relevant result type. They are primarily a visibility metric. Rising impressions can result from better positions, visibility for additional queries, increased search demand, new indexed content, or changes in how Google presents results.

Impressions should therefore be interpreted with clicks and position. If impressions rise while average position remains broadly stable, search demand or query coverage may have grown. If impressions and position improve together, stronger organic visibility is a more plausible explanation.

Google Search Console CTR

CTR, or click-through rate, is calculated by dividing clicks by impressions. It indicates how frequently an impression resulted in a click. CTR depends on position, query intent, device, country, brand familiarity, title relevance, snippet presentation, and the other features displayed on the results page.

There is no universal “good” Google Search Console CTR. A branded query in a top position cannot be compared fairly with a broad informational query that appears below videos, images, advertisements, or other search features. Compare CTR within a relevant segment rather than against a sitewide benchmark.

Average Position in Google Search Console

Average position is not a fixed ranking. Google records the topmost position occupied by a result from the property or page for an impression and then averages those values across the selected data. The resulting number can combine different queries, locations, devices, result layouts, and dates.

An average position of 8 does not mean the page consistently ranked eighth. It may have appeared higher for some searches and much lower for others. Narrow the report to a specific query, page, country, and device when you need a more meaningful view, while still treating the result as an average rather than a guaranteed live ranking.

How to Set Date Ranges and Compare Periods

A date comparison should isolate a useful change rather than combine unrelated conditions. Comparing the last 28 days with the previous 28 days is suitable for recent movement. Comparing a month or quarter with the equivalent period in the previous year is usually better for a seasonal business.

Use the following process to create a reliable comparison:

  1. Open the Performance report for Search results.
  2. Select the Date filter.
  3. Choose Compare and select two periods of equal length.
  4. Use equivalent weekdays where possible.
  5. Apply the same query, page, country, device, search type, and appearance filters to both periods.
  6. Review absolute differences as well as percentage changes.

Weekly or monthly granularity can reduce day-of-week noise and make longer trends easier to interpret. You should also account for holidays, promotions, news events, site migrations, content launches, and changes in search demand.

Be careful with the newest data. Preliminary points may be marked with a dotted line and can change as collection finishes. The 24-hour view also includes recent data with only a short delay, which makes it useful for monitoring but less suitable for final reporting.

How to Analyze Search Queries

The Google Search Console Queries tab reveals the searches associated with impressions and clicks for your property. Start by deciding what you want to learn. Reviewing all queries may help you understand topic coverage, but filtering by a page is more useful when you want to discover how people find one specific landing page.

A practical query-analysis workflow is:

  1. Select a representative date range and an equivalent comparison period.
  2. Open the Queries tab.
  3. Sort by impressions to find the searches with the greatest visibility.
  4. Sort by clicks to identify the main traffic drivers.
  5. Review CTR alongside average position rather than in isolation.
  6. Filter by a relevant page to see the queries connected with that URL.
  7. Filter by a query to see which pages Google shows for that search.

Query and page filters answer opposite sides of the same question. A page filter shows which searches expose this page. A query filter shows which pages appear for this search. The second view can reveal overlapping URLs, changing landing pages, or a page that does not match the intended search need.

Search Console supports containing, excluding, exact, and regular-expression filters for queries. However, rare anonymized queries are omitted from the query table, and applying query filters can change the totals because of privacy protection and data truncation. Filtered branded and non-branded totals may therefore be useful estimates without adding up perfectly to the unfiltered total.

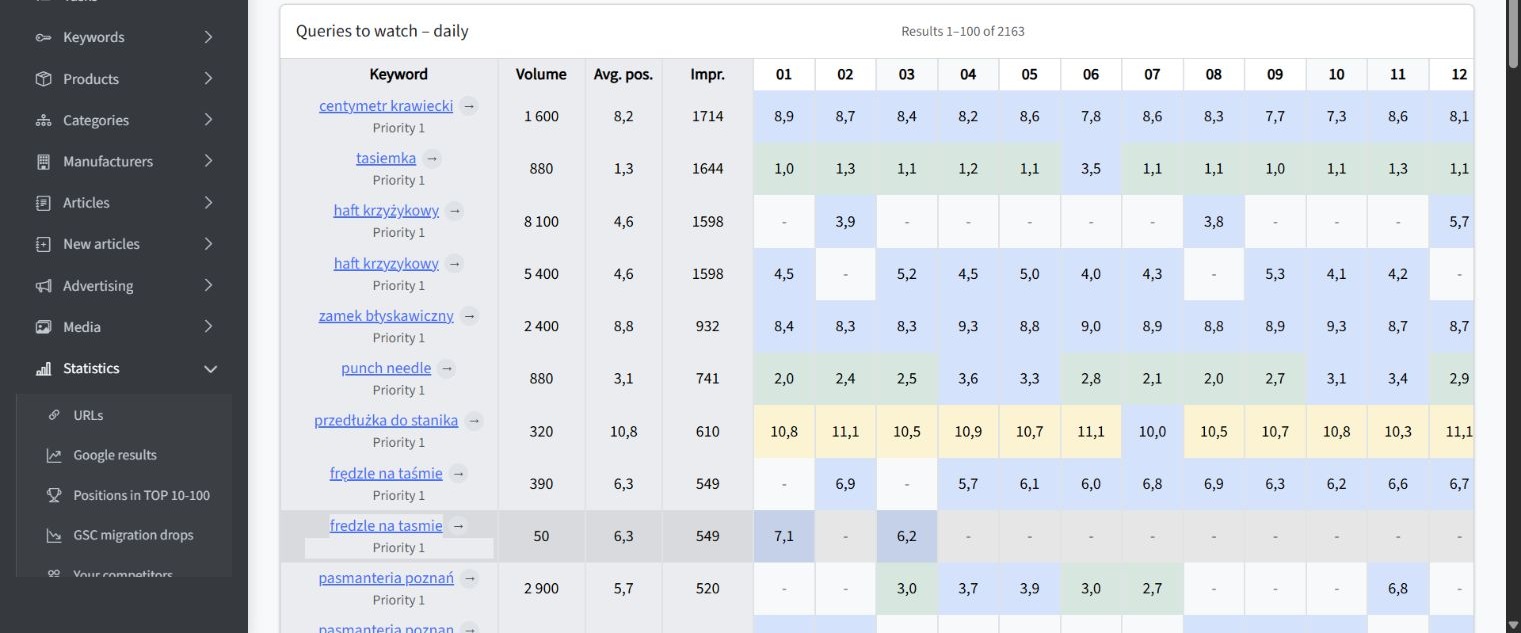
The following example is an SEOAssistant application view based on Google Search Console data, not the native Search Console interface. Captured on October 19, 2026, it shows daily position history for accepted keywords alongside impressions and average position. The day-to-day variations reinforce an important point: reported positions are averages, not fixed rankings guaranteed for every searcher.

SEOAssistant: Daily keyword position history (English interface)
SEOAssistant — Daily keyword position history

How to Analyze Pages and Landing-Page Performance

The Pages tab helps you determine which landing pages gained or lost organic visibility. Compare clicks, impressions, CTR, and average position for individual URLs, but avoid assuming that the same metric change has the same cause on every page.

Begin with three separate views:

  • Top pages by clicks to identify the URLs currently producing the most organic traffic.
  • Top pages by impressions to find pages with substantial visibility, including underperforming opportunities.
  • Largest period-over-period changes to locate meaningful gains and declines.

Once you select a page, switch to the Queries tab. This reveals whether the page is gaining visibility for relevant searches, losing an established query group, or appearing for terms that do not match its purpose.

Most Performance data is credited to the canonical URL selected by Google, and the Pages dimension groups data by the final URL after redirects. If a duplicate or redirected address does not appear as expected, the metrics may be assigned to another canonical page.

When a specific page behaves unexpectedly, you can inspect a page with unexpected search performance to check Google’s indexed information, selected canonical, crawl details, and current live version. Use URL Inspection for an individual URL; use the Performance report to evaluate trends across a wider set of pages.

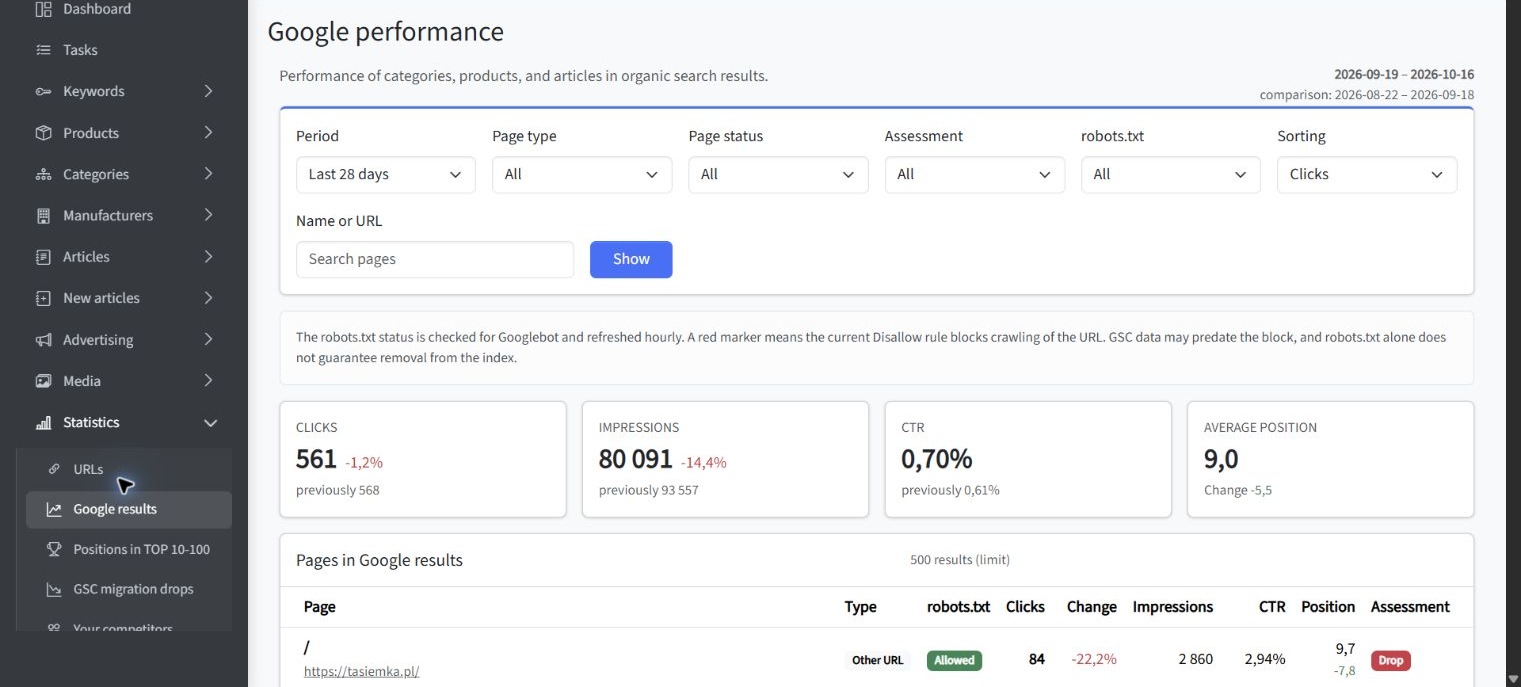
The supplementary view below comes from SEOAssistant, not from the native Google Search Console interface. Captured on October 19, 2026, it presents page-level GSC metrics for tasiemka.pl and supports comparisons involving clicks, impressions, CTR, average position, page types, declines, growth opportunities, and robots.txt status.

SEOAssistant: Google Search Console page performance (English interface)
SEOAssistant — Google Search Console page performance

How to Use Country, Device, and Search Appearance Filters

Sitewide averages can hide important differences. A page may perform well on desktop but have weak mobile CTR, or gain impressions in one country while losing visibility in its primary market. Country, Device, and Search appearance filters help you test these explanations.

Country

Use the Country dimension to separate markets with different languages, competitors, search demand, and user expectations. If a decline occurs in only one country, a global technical problem becomes less likely. Check whether the affected page is localized appropriately and whether the compared periods contain regional holidays or events.

Device

Compare mobile and desktop when CTR or clicks change unexpectedly. Different screen sizes and search-result layouts can affect what users see before your result. A mobile-specific decline may justify reviewing titles, snippets, page usability, and the result types appearing above your listing.

Search Appearance

Search appearance groups data for supported result formats associated with your property. The available options depend on what Google has recorded for the site, so not every property will display the same categories. Use this dimension to determine whether a change is concentrated in one appearance type rather than affecting ordinary search visibility broadly.

Change one major variable at a time when investigating a problem. If you simultaneously alter the country, device, page, query, and date filters, you may create a segment that is too small or complex to interpret reliably.

How to Find High-Impression, Low-CTR Opportunities

High impressions combined with weak CTR can identify useful optimization opportunities, but only after you confirm that the query is relevant and the position offers a realistic chance of attracting clicks. A page averaging position 40 should not be evaluated like one appearing near the top of the first results page.

Use this workflow:

  1. Choose a stable period with enough data.
  2. Open Queries and sort by impressions.
  3. Identify relevant queries with weaker CTR than comparable queries in similar positions.
  4. Select a query and open Pages to find the landing URL receiving its impressions.
  5. Check country, device, and search appearance for concentrated differences.
  6. Review the live search results to understand intent and competing result formats.
  7. Improve the page only where the title, description, content, or targeting does not accurately represent the search need.

A title change may help when the existing wording is vague, outdated, or poorly aligned with the page. It will not solve a deeper intent mismatch. If users want a product comparison but the landing page provides only a short category description, the content may need substantive revision rather than a more persuasive title.

After identifying promising queries and pages, a connected SEO workflow can help turn the findings into controlled content improvements with review and measurement steps. Teams working across several platforms may also benefit from understanding how an operational SEO platform compares with common SEO tool stacks. The objective is not to maximize editing activity, but to connect evidence, approval, implementation, and follow-up measurement.

How to Find Pages Losing Organic Search Visibility

A decline in clicks is a symptom, not a diagnosis. Compare the page across equivalent periods and then examine impressions, CTR, position, queries, countries, and devices to narrow the possible causes.

The following patterns provide a practical starting point:

  • Clicks down, impressions stable, position stable: investigate CTR, search-result layout, title relevance, and changes in user preference.
  • Clicks and impressions down, position broadly stable: consider lower search demand, seasonality, or loss of query coverage that is hidden by the overall average.
  • Clicks down, impressions down, position worse: investigate lost visibility, competing pages, content relevance, internal linking, and possible technical issues.
  • Position stable but important queries disappear: check whether the page is still being shown for the same search-intent group.
  • A decline affects one device or country: investigate that segment before changing the entire page.
  • A decline begins after a URL, canonical, or template change: verify indexing, redirects, canonicals, and page accessibility.

Page-level averages can conceal opposing query movements. A page may lose a valuable commercial query while gaining many lower-value informational impressions, leaving its average position apparently unchanged. Always examine the queries responsible for the page’s performance before choosing a response.

Also check whether the decline matches a known reporting anomaly, migration, campaign, algorithmic change, or seasonal event. A timeline can establish correlation, but Search Console data alone cannot prove that one SEO edit caused the result.

How to Separate Brand and Non-Brand Searches

Brand and non-brand queries represent different forms of demand. Branded searches usually come from people already aware of the organization, while non-brand searches can indicate discovery through products, services, problems, or informational topics.

Eligible properties can use the branded and non-branded query filter in the Performance report. Google notes that the classification may occasionally be incorrect, and the feature may not be available for sites with low impression volumes or certain sub-properties.

If the built-in option is unavailable or you need greater control, create a regular-expression query filter covering the main brand name, common abbreviations, product brands, domain variations, and frequent misspellings. Use the same expression consistently in each reporting period.

For example, a business known as both “Example Company” and “ExampleCo” could define one filter that includes both variations. The corresponding exclusion filter would approximate non-brand activity. Because anonymized queries and truncated data can affect query-filter totals, do not expect the two segments to reconstruct the exact unfiltered total.

Track brand and non-brand trends separately. A rise in branded clicks may reflect increased awareness from advertising, publicity, offline activity, or returning customers. Growth in relevant non-brand impressions and clicks is generally more informative when evaluating whether search content is reaching new demand.

How to Export and Interpret Performance Data

The Export option lets you download the current report view to Google Sheets, Microsoft Excel, or CSV. Filters and groupings applied in the interface are included, making exports useful for page inventories, query analysis, period comparisons, and collaboration.

Direct report exports are limited to the table rows available in the interface, generally up to 1,000 representative rows. Report totals can still include data that does not appear in the exported table. For larger datasets, the Search Console API provides more flexible extraction, although it also has row and data limits and does not guarantee every possible row.

Before interpreting an export, record its scope:

  • Search Console property.
  • Date range and comparison period.
  • Search type.
  • Applied query and page filters.
  • Country and device segments.
  • Selected dimensions.
  • Export date.
  • Whether recent data was preliminary.

This context prevents two exports with different filters from being treated as equivalent. It also makes recurring analysis repeatable.

Do not calculate a simple average of row-level CTR percentages. Combined CTR should be calculated from combined clicks divided by combined impressions. Similarly, position should be weighted by impressions when combining equivalent rows, although differences in aggregation, anonymized queries, and truncation can still prevent a spreadsheet result from matching the interface exactly.

Common Performance Report Mistakes

Most reporting errors come from interpreting a metric without checking how the data was segmented or counted. Avoid the following mistakes:

  • Treating average position as a fixed daily rank. It is an average across recorded impressions and conditions.
  • Evaluating CTR without position and intent. Low CTR may be normal for a lower position or a query answered directly on the results page.
  • Comparing unequal date ranges. Different numbers of days or weekdays can distort the conclusion.
  • Ignoring seasonality. Previous-period comparisons may be unsuitable for annual demand cycles.
  • Using preliminary data as a final result. Recent figures can still change.
  • Expecting table rows to equal chart totals. Row limits, anonymized queries, and aggregation rules can create legitimate differences.
  • Comparing Search Console clicks directly with analytics sessions. The systems measure different events and process data differently.
  • Applying too many filters at once. Small segments can produce unstable percentages and misleading conclusions.
  • Assuming every decline requires a content rewrite. Demand, result layouts, indexing, devices, countries, and technical changes should also be checked.
  • Claiming that correlation proves causation. A change after an SEO update supports investigation, not certainty.

Google documents several reasons why chart totals, table values, exports, and analytics data can differ. These include privacy protection, row limits, processing rules, time zones, preliminary data, and property-versus-page aggregation.

Key Takeaways from Google Search Console Performance

The most useful conclusions from the Performance report are based on combinations of metrics and controlled comparisons:

  • Use clicks to measure delivered search traffic, impressions to assess visibility, CTR to evaluate click capture, and average position as a directional ranking indicator.
  • Compare periods of equal length and account for weekdays, seasonality, reporting delays, and external events.
  • Filter a page to discover its queries, and filter a query to discover its landing pages.
  • Segment by country, device, and search appearance before making sitewide changes.
  • Prioritize high-impression, low-CTR opportunities only when the query, position, and landing page are relevant.
  • Diagnose declining pages through their query mix rather than relying only on page-level averages.
  • Separate brand and non-brand demand, while recognizing the limitations of query classification and anonymized data.
  • Document every export’s filters and scope so that future comparisons remain consistent.
  • Treat Search Console patterns as evidence for investigation, not automatic proof of cause.

Summary

The Google Search Console Performance report becomes useful when you move beyond checking whether clicks went up or down. Define the question first, select equivalent date ranges, apply only the filters needed to answer it, and interpret Google Search Console clicks and impressions alongside CTR and average position.

A reliable workflow is simple: identify the affected query or page, segment the data, compare like with like, verify technical assumptions, and make one controlled improvement at a time. Then return to the same report after enough data has accumulated. This approach turns Search Console from a collection of fluctuating metrics into a repeatable system for prioritizing and measuring organic search work.

Google Search Console Indexing Report: How to Find and Fix Page Issues

A growing number of non-indexed URLs does not automatically mean your website has an SEO problem. Google does not need to index every URL it discovers. The practical goal is to ensure that valuable canonical pages can be crawled, understood and selected for indexing, while duplicate, redirected or intentionally blocked URLs remain excluded. The Google Search Console indexing report helps you make that distinction and identify the issues that deserve attention. Google Search Console Help

This guide explains how to interpret common statuses, investigate Google Search Console page indexing problems and validate technical fixes. If you are new to the platform, begin with our beginner’s guide to Google Search Console before working through the diagnostics below.

What the Google Search Console Page Indexing Report Tells You

The Page indexing report shows the indexing status of URLs Google knows about within your Search Console property. Its summary separates indexed URLs from URLs that are not indexed and groups affected pages by the reason Google assigned to them. Selecting a reason opens a detailed view with example URLs and historical data. Google Search Console Help

The report helps you answer three practical questions:

  • Are the important canonical pages on your website indexed?
  • Are valuable pages being excluded because of a technical or content-related issue?
  • Are large groups of unwanted, duplicate or low-value URLs consuming unnecessary crawling attention?

Do not treat the indexed-page count as a target by itself. Search Console may know about filter URLs, tracking parameters, redirects, duplicate versions, expired pages and other URLs that should not appear independently in search results. The useful comparison is between your intended indexable inventory and Google’s reported decisions.

Search Console also does not guarantee that an indexed page will appear for a particular query. Indexing makes a page eligible to appear, but visibility still depends on factors such as relevance, search context and Google’s ranking systems. Google Search Console Help

Indexed, Not Indexed and Excluded Pages Explained

An indexed URL has been processed and added to Google’s index. It may be eligible to appear in search results, although indexing alone does not guarantee impressions, clicks or rankings. A page can also be indexed while having separate enhancement or structured-data issues. Google Search Console Help

A not indexed URL has not been added to the index. This can indicate a genuine problem, but it can also reflect an intentional or appropriate outcome. Examples include redirects, duplicate pages, alternate versions, pages carrying a noindex directive and URLs blocked from crawling.

The word excluded is commonly used to describe known URLs that Google has not indexed. In the current report, focus on the specific reason under the Not indexed status rather than assuming that every exclusion requires a fix. Google explicitly advises against expecting complete indexing coverage because only canonical pages generally need to be indexed. Google Search Console Help

A healthy report can therefore contain many non-indexed URLs. What matters is whether each URL group matches your intended indexing rules.

Supplementary SEOAssistant Indexing Overview

The following SEOAssistant view provides a supplementary overview of sitemap coverage and indexing status. It is filtered to indexed URLs and can help you compare groups by page type, sitemap presence and inspection status. It illustrates an external workflow for reviewing indexing data rather than a native Search Console report or a diagnosis of a specific non-indexed error.

SEOAssistant: Sitemap URLs and indexing status (English interface)
SEOAssistant — Sitemap URLs and indexing status

Which Non-Indexed Pages Are Actually a Problem?

A non-indexed page becomes a priority when the URL is valuable, canonical and intended to attract organic search traffic. Product pages, service pages, categories, location pages and substantive articles usually warrant investigation when they are unexpectedly absent from the index.

Before attempting a fix, evaluate the affected group against the following conditions:

  • The page is intended to appear in organic search.
  • It returns a successful response and displays its main content correctly.
  • It is not intentionally redirected, removed or marked noindex.
  • It is the preferred canonical version of its content.
  • It is accessible through useful internal links.
  • It is included in the XML sitemap when appropriate.
  • It provides distinct value rather than repeating another indexable URL.

If these conditions are not met, exclusion may be correct. For example, a checkout page, internal search result, tracking-parameter URL or duplicate filter combination usually does not need independent search visibility.

Investigate patterns rather than blindly repairing individual examples. If hundreds of URLs from one page template share a status, inspect the template, canonical rules, internal linking and generated metadata. A template-level correction is usually more reliable than editing sampled URLs one at a time.

How to Investigate Crawled—Currently Not Indexed

Crawled—currently not indexed means Google crawled the page but did not add it to the index. Google may reconsider the page later, and its documentation states that there is no need to resubmit the URL merely because it has this status. Google Search Console Help

This status does not identify one specific defect. It confirms that discovery and crawling occurred, so the investigation should concentrate on what Google received and how the URL relates to the rest of the website.

Use the following diagnostic sequence:

  1. Confirm that the page should be indexed. Check whether it is a valuable canonical page rather than a duplicate, filter, archive or temporary URL.
  2. Inspect the rendered page. Verify that the main content loads for Google and that the page is not blank, incomplete or dominated by an error message.
  3. Check indexing directives. Confirm that the current page does not contain a noindex instruction in its HTML or HTTP headers.
  4. Compare canonical signals. Review the user-declared canonical, internal links, sitemap entry and redirects for conflicting destination URLs.
  5. Assess content differentiation. Compare the page with similar indexed pages and determine whether it offers a distinct purpose, useful information and meaningful primary content.
  6. Review internal links. Important pages should be linked from relevant navigation, categories, hubs or related content rather than existing only in a sitemap.
  7. Check the wider URL group. Determine whether the status affects one page, one template or a large section of the website.

After making a substantive correction, test the current page and request indexing once if appropriate. Repeated requests do not guarantee inclusion and should not replace fixing the underlying template, content or canonicalization problem.

How to Investigate Discovered—Currently Not Indexed

Discovered—currently not indexed means Google knows the URL but has not yet crawled it. Google explains that crawling may have been rescheduled when attempting it was expected to overload the website. The report therefore has no last crawl date for the URL. Google Search Console Help

A few newly published URLs in this category may simply need time. A large or growing group deserves closer analysis, particularly when it includes important pages.

Review the following areas:

  • Internal discovery: Make sure important URLs have crawlable links from established pages.
  • Sitemap quality: Include canonical, indexable URLs rather than redirects, duplicates, blocked pages or obsolete inventory.
  • URL generation: Look for faceted navigation, calendar paths, session parameters and other systems that create excessive URL combinations.
  • Server capacity: Examine hosting availability, response times, timeouts and 5xx responses.
  • Site architecture: Reduce unnecessary click depth for priority pages.
  • Inventory consistency: Remove obsolete URLs from internal links and sitemaps instead of repeatedly presenting them for crawling.

If sitemap data appears inconsistent, check and submit your XML sitemap. A sitemap helps Google discover URLs, but it does not force crawling or indexing. The sitemap should reinforce your preferred inventory rather than list every URL the platform can generate.

Duplicate and Canonicalization Statuses Explained

Google groups URLs with the same or substantially similar content and chooses one representative canonical URL. Duplicate URLs are generally not indexed separately. This is normal when Google selects the version you intended to consolidate. Google Search Central: Canonicalization

Alternate Page with Proper Canonical Tag

This status usually indicates that the alternate URL correctly points to an indexed canonical version. No fix is needed if the selected canonical matches your plan. Google Search Console Help

Duplicate Without User-Selected Canonical

Google identified the page as a duplicate even though you did not declare a preferred canonical. Inspect the URL to see which page Google selected. If that selection is acceptable, the status is not an error. If it is incorrect, add consistent canonical signals and make the intended page clearly preferable. Google Search Console Help

Duplicate, Google Chose Different Canonical Than User

This means your declared canonical and Google-selected canonical differ. Compare the tested URL, your declared canonical and Google’s selection. Check whether the pages are genuinely equivalent and whether redirects, internal links, sitemap entries and canonical elements point consistently to the same preferred URL. A canonical declaration is a signal rather than an absolute command. Google Search Central: Canonicalization

Do not use robots.txt to manage canonicalization. Google recommends consistent internal links, self-referential canonicals on preferred pages and aligned signals across canonical annotations and sitemaps. Google Search Central: Consolidate Duplicate URLs

Robots.txt, Noindex, Redirect and Server Error Issues

URL Blocked by Robots.txt

A robots.txt rule controls crawling, not reliable removal from the index. Google may still know about a blocked URL through links and may index limited information without crawling its content. If the page should be indexed, remove the unintended block. If it must stay out of search results, allow crawling and use noindex, or protect the content behind authentication when appropriate. Google Search Console Help

URL Marked Noindex

This status means Google found a noindex directive and followed it. It is correct for pages intentionally excluded from search. If the page should be indexed, remove the directive from both the HTML and HTTP response, run a live test and confirm that indexing is allowed. Google must be able to crawl a page to see and process its noindex instruction. Google Search Central: Robots Meta Tags

Page with Redirect and Redirect Errors

A correctly redirected source URL is not expected to be indexed; the destination may be indexed instead. Investigate the issue only when the redirect is unintended or when Search Console reports a redirect error such as a loop, an excessive chain or an invalid destination. Google Search Console Help

Server Error, Access Error and Soft 404

A 5xx status indicates that Googlebot could not obtain a usable response because of a server problem, timeout or overload. Review the affected template, hosting logs, Crawl Stats and infrastructure controls that may be blocking verified Googlebot requests. Persistent server failures can reduce crawling because Googlebot adjusts its activity when a server struggles to respond. Google Search Console Help

A soft 404 occurs when a URL returns a successful response but presents missing, empty or error-like content. Return a genuine 404 or 410 status when content no longer exists, use a permanent redirect when there is a clear replacement, or improve the page when valid content should remain available. Google Search Central: Troubleshoot Crawling Errors

How to Prioritize Google Search Console Page Indexing Issues

Do not prioritize issues solely by the number of affected URLs. A problem affecting ten revenue-critical pages can matter more than an expected exclusion affecting thousands of filter URLs.

A practical prioritization framework is:

  1. Business importance: Address canonical pages that support important products, services, categories or customer questions.
  2. Indexing intent: Confirm that the affected URLs are genuinely meant to appear in search.
  3. Scope: Give priority to issues caused by shared templates, navigation or platform rules.
  4. Severity: Server errors, accidental noindex rules and incorrect canonicalization usually require faster action than expected redirects.
  5. Trend: Investigate sudden changes after a deployment, migration, redesign or content-management update.
  6. Fix control: Start with issues where the source is identified as the website and where your team can make a verifiable change.

Search Console sorts issues using its own assessment, but you still need to combine the report with business value and indexing intent. Before changing a sitewide rule, sample URLs from different sections to confirm that they share the same cause.

How to Validate a Fix in Google Search Console

Use Validate fix after correcting all known instances within a specific issue group. Search Console initially checks sample pages and then works through the known affected URLs. If it finds the issue on a checked page, validation can stop or fail. Google notes that validation often takes up to approximately two weeks and can sometimes take longer. Google Search Console Help

The correct workflow is:

  1. Identify the cause across the full URL group.
  2. Correct the page template, configuration or content.
  3. Test representative URLs, including edge cases.
  4. Confirm that the live pages return the intended responses and directives.
  5. Start validation from the relevant issue details page.
  6. Monitor passing, failed and pending examples.
  7. If validation fails, inspect the URL that caused the failure before restarting the process.

Validation starts Google’s rechecking process. It does not guarantee that a page will be indexed. It confirms whether the reported condition is still present, and a URL can even be treated as fixed when it becomes unavailable, is removed or is intentionally marked noindex. Indexing remains a separate decision. Google Search Console Help

When to Use URL Inspection for Further Diagnosis

The Page indexing report is designed for monitoring groups and trends. The URL Inspection tool is more suitable when you need to understand one specific page. Use it to compare Google’s stored information with the current live version and to review crawl permission, indexing permission, page fetching and canonical details. Google Search Console Help: URL Inspection

Use URL Inspection when:

  • An important page appears in an unexpected non-indexed group.
  • You need to see the user-declared and Google-selected canonicals.
  • You recently removed a noindex directive or robots.txt block.
  • You need to reproduce a server, rendering or access problem.
  • The report reflects an old crawl and the live page has already changed.
  • You want to request indexing after a meaningful correction or update.

Remember that the default inspection result describes Google’s last indexed or crawled information, not necessarily the page as it exists now. A live test checks current access but does not reproduce every indexing decision. Duplicate and canonical conditions, in particular, are determined by Google’s indexing systems rather than the live test. Google Search Console Help: URL Inspection

For a detailed workflow, learn how to diagnose a specific indexing issue with URL Inspection.

Google Search Console Indexing Mistakes to Avoid

Many indexing investigations become inefficient because the report is treated as a simple pass-or-fail score. Avoid the following mistakes:

  • Trying to index every known URL. Duplicate, redirected and intentionally excluded URLs often should remain outside the index.
  • Using robots.txt as a removal tool. Blocking crawling does not reliably prevent a URL from being indexed.
  • Requesting indexing repeatedly. Requests do not override technical problems or guarantee selection.
  • Editing only sampled URLs. A shared template or platform rule may continue generating the same issue elsewhere.
  • Ignoring crawl dates. Search Console may show data collected before your latest change.
  • Submitting unsuitable sitemap URLs. Redirects, duplicates, noindex pages and error URLs weaken the sitemap’s role as a list of preferred pages.
  • Assuming canonical tags are commands. Conflicting signals can lead Google to select another representative URL.
  • Validating before testing. Validation can fail quickly when even one known instance remains unresolved.
  • Confusing indexing with ranking. An indexed URL is eligible to appear, but it is not guaranteed visibility or traffic.

Key Conclusions

The most useful conclusions from the Google Search Console indexing report are:

  • Not every URL Google discovers should be indexed.
  • The priority is to index valuable canonical pages, not to achieve 100% coverage.
  • Intentional exclusions should be separated from problems affecting important pages.
  • Crawled—currently not indexed and discovered—currently not indexed require different investigations.
  • URL groups and templates are usually more important than isolated examples.
  • Canonical, internal-link and sitemap signals should consistently support the preferred URL.
  • Validation asks Google to recheck an issue but does not guarantee indexing.
  • URL Inspection provides page-level evidence, while the indexing report reveals broader patterns.

Summary: Turn the Indexing Report into a Decision Process

When asking “Why is my page not indexed by Google?”, begin with indexing intent rather than the status label. Decide whether the URL should appear in search, confirm that it is the preferred canonical page and then identify whether the obstacle involves crawling, indexing directives, duplication, content delivery or server access.

Review affected URL groups, test representative pages and correct the underlying system before starting validation. This approach keeps attention on genuine page indexing issues and prevents time being spent on exclusions that are intentional or technically appropriate.

How to Submit a Sitemap in Google Search Console

Submitting a sitemap to Google Search Console is simple, but a successful submission does not mean every listed page will be indexed. The real objective is to give Google a reliable, accurate list of the canonical URLs you want it to discover. This guide explains how to locate or create that file, submit it correctly, interpret its status and resolve common Google Search Console sitemap errors.

What Is an XML Sitemap?

An XML sitemap is a machine-readable file that lists pages, videos, images or other resources you consider important. Search engines use it as a discovery signal, particularly when a website is large, new, frequently updated or difficult to navigate through internal links.

An XML sitemap is different from a visual HTML sitemap. The XML version is designed primarily for search engines and contains structured URL data. An HTML sitemap is a web page created for visitors, usually presenting links to important sections in a readable layout. One does not replace the other because they serve different audiences.

A well-maintained XML sitemap should normally contain complete, canonical URLs that you want to appear in search results. Google recommends using absolute URLs and including the preferred version of each page rather than every duplicate variation.

Do You Need to Submit a Sitemap to Google?

Not every website strictly needs a sitemap. Google can discover pages by following crawlable internal and external links. A small website with roughly 500 or fewer indexable pages may not require one if every important page is easily reachable from the homepage.

A sitemap becomes more useful under several common conditions:

  • Your website has a large number of products, articles, categories or other indexable pages.
  • Your website is new and has few external links pointing to it.
  • Some important pages are not well connected through internal navigation.
  • Your content changes frequently or new URLs are published regularly.
  • Your website contains substantial video, image or news content.
  • You need a structured way to monitor URL discovery by page type or website section.

Even when Google could discover your pages without one, submitting a clean sitemap provides additional control and diagnostic information. It lets you confirm whether Google can fetch the file and identify processing errors through the Sitemaps report. Google notes, however, that sitemap inclusion does not guarantee crawling or indexing.

How to Find Your Sitemap URL

Many content management and ecommerce platforms generate an XML sitemap automatically. Before creating a new file, check whether one already exists and whether it accurately represents your current indexable content.

You can locate the sitemap using the following process:

  1. Check common paths on your domain, such as /sitemap.xml and /sitemap_index.xml.
  2. Open your website’s /robots.txt file and look for a line beginning with Sitemap:.
  3. Review your CMS, SEO plugin or ecommerce platform settings.
  4. Ask your developer or hosting provider where the sitemap is generated.
  5. If no sitemap exists, use your website software to generate one automatically.

When you open the file, you should see XML data containing URL locations or a sitemap index that points to several individual sitemap files. A human-friendly stylesheet may make the file look like a regular page, but the underlying response must still contain valid sitemap data.

What If Your Website Does Not Generate a Sitemap?

A very small, stable website can use a manually created sitemap, but manual maintenance becomes unreliable as the site grows. For more than a few dozen URLs, it is usually better to generate the file directly from the website database or CMS. This reduces the risk of leaving deleted pages in the sitemap or omitting newly published content.

What to Check Before Submitting a Sitemap

Submitting an inaccurate sitemap can create confusing reports without solving discovery problems. Review both the sitemap file and a representative sample of its URLs before adding the sitemap to Google Search Console.

Your pre-submission checklist should include the following points:

  • Canonical URLs: Include the preferred version of each page, not duplicate protocol, hostname, parameter or tracking variations.
  • Indexable pages: Exclude URLs intentionally marked with a noindex directive.
  • Successful responses: Valuable listed pages should normally return an HTTP 200 success response.
  • No unnecessary redirects: List the final destination URL instead of an old URL that redirects elsewhere.
  • Correct domain and protocol: Ensure that HTTP, HTTPS, www and non-www versions match your chosen canonical structure.
  • Absolute addresses: Each entry should contain the complete URL rather than a relative path.
  • Crawl access: Confirm that Googlebot is not unintentionally blocked from the sitemap or important pages.
  • Valid XML: Check the namespace, encoding, required elements and escaped special characters.
  • Accurate modification dates: Use last-modified information only when it reflects a meaningful page update.
  • File limits: Keep each sitemap below 50,000 URLs and 50 MB when uncompressed.

These checks separate sitemap quality from page quality. A sitemap can be processed successfully even when some listed pages redirect, return errors or remain non-indexable. Conversely, valid pages may be indexed even if they were discovered through internal links rather than the sitemap.

How to Submit a Sitemap in Google Search Console Step by Step

Before you begin, you need access to the correct property. If the site has not yet been added, follow the instructions to set up and verify Google Search Console first. Google currently requires owner permissions to submit a sitemap through the Sitemaps report.

Once access and the sitemap file are ready, follow these steps:

  1. Select the correct property. Confirm that you are working with the property covering the sitemap and its listed URLs.
  2. Open the Sitemaps report. In Google Search Console, find the Sitemaps option under the indexing-related reports.
  3. Locate the submission field. Find the area labelled Add a new sitemap.
  4. Enter the sitemap location. Add the requested sitemap path or exact sitemap address shown for the selected property.
  5. Select Submit. Google will record the request and attempt to fetch the file.
  6. Review the initial status. Processing may not be immediate, so return to the report if a final result is not yet available.
  7. Open the submitted row. Review detailed information if the status reports an error or fetch problem.

You are not uploading the XML file into Search Console. The file must already be hosted and publicly accessible on your website. Submission only tells Google where to find it.

How to Read the Submitted Sitemaps Report

The Submitted sitemaps table helps you determine whether Google can retrieve and process your Google Search Console sitemap. It is not a complete page indexing report.

Review the following fields when assessing a submission:

  • Sitemap URL: The location submitted through the report or API.
  • Type: For example, an individual sitemap, sitemap index, RSS feed or Atom feed.
  • Submitted: The date of the most recent submission through Search Console.
  • Last read: The latest time Google successfully fetched the sitemap.
  • Status: Whether the sitemap was processed successfully or encountered a fetch or parsing problem.
  • Discovered pages: The number of page URLs Google identified through the processed sitemap data.

Success means Google fetched and read the sitemap without a reported processing error. It does not mean all discovered URLs have been crawled, indexed or ranked.

Couldn’t fetch means Google could not retrieve the sitemap file. The problem is therefore at the sitemap access level rather than necessarily affecting every page listed inside it.

Has errors or Sitemap had errors means Google could retrieve at least part of the file but encountered one or more processing problems. Valid entries may still be used even when other entries contain errors.

How to Fix Couldn’t Fetch and Sitemap Could Not Be Read Errors

The first diagnostic decision is whether Google failed to retrieve the file or retrieved it but could not parse its contents. These are different failure types and require different checks.

How to Troubleshoot a Couldn’t Fetch Status

If the report says Couldn’t fetch, verify the sitemap’s availability before editing its XML structure.

  • Open the exact submitted location and confirm that the file exists.
  • Check for a 404, 403, 500 or other non-success response.
  • Confirm that no login, firewall, security plugin or access rule blocks Googlebot.
  • Review robots.txt for a rule preventing the sitemap from being fetched.
  • Check for redirect loops, excessive redirect chains or a redirect to an unrelated location.
  • Confirm that the website and hosting server were available when Google attempted the fetch.
  • Make sure you submitted the correct filename, path, protocol and hostname.

You can also inspect the sitemap location with the URL Inspection tool and run a live test. In the availability details, check whether crawling is allowed and whether the page fetch is successful. This can reveal a server or access problem that is not visible in a normal browser session.

How to Troubleshoot a Sitemap That Could Not Be Read

If Google can access the file but cannot process it correctly, inspect the format and contents.

  • Validate the XML structure and required sitemap namespace.
  • Remove leading output, error messages or HTML inserted before the XML declaration.
  • Escape special characters appearing within URL values.
  • Use complete URLs instead of relative paths.
  • Correct hostname, protocol or directory mismatches.
  • Remove malformed, empty or unsupported entries.
  • Confirm that an individual sitemap does not exceed the size or URL limit.
  • Ensure that a sitemap index lists sitemap files rather than other sitemap index files.
  • Check compressed files for gzip or decompression errors.

Do not repeatedly resubmit an unchanged broken file. Fix the underlying access or parsing problem, verify the corrected version and then submit it again. Google may retry temporary failures, but persistent critical errors can cause it to stop attempting to process that sitemap.

How to Handle Multiple Sitemaps and Sitemap Index Files

A single sitemap is limited to 50,000 URLs or 50 MB when uncompressed. Larger websites must divide their URLs into smaller files. A sitemap index can then list those individual files, allowing you to submit one central location to Google Search Console.

Even below the technical limit, segmentation can make monitoring easier. Useful divisions may include:

  • Products and product categories.
  • Articles, guides and news content.
  • Images or videos requiring specialized sitemap data.
  • Separate countries or language versions.
  • Major website sections managed by different systems.

Use segmentation only when it creates practical diagnostic value. Splitting a small website into dozens of files usually adds maintenance without improving discovery.

For example, if product URLs are stored separately from articles, a sharp change in one sitemap’s discovered page count is easier to connect to the relevant template, publishing workflow or canonical configuration. The sitemap structure becomes a monitoring tool rather than merely a list of URLs.

How to Update or Remove a Submitted Sitemap

You do not normally need to submit the sitemap every time a page is published. Once Google has successfully read it, Google can revisit the file periodically. Your CMS should update the existing file automatically when canonical, indexable pages are added, changed or removed.

Use the following process after major structural changes or a corrected sitemap error:

  1. Update or regenerate the sitemap at its existing location.
  2. Open the file and confirm that the corrected version is publicly available.
  3. Test representative URLs and verify the XML structure.
  4. Resubmit the sitemap if the change is important or follows a persistent failure.
  5. Monitor the latest read date, status and processing details.

Removing a sitemap from the Search Console report only removes that submission from the report. It does not automatically remove its URLs from Google’s records or search results. If a page should no longer be indexed, apply the appropriate page-level action, such as a permanent redirect, a genuine not-found response or a noindex directive. The correct choice depends on whether the content has moved, been deleted or should remain available to visitors.

Why Sitemap Submission Does Not Guarantee Indexing

A sitemap primarily supports discovery. After discovering a URL, Google still decides whether to crawl it. If crawled, the page must then be processed and evaluated for indexing. These are separate stages, and not every discovered or crawled page reaches the index.

Important pages should be publicly accessible, return a successful response, allow indexing and provide useful indexable content. They should also use consistent canonical signals. Meeting these technical requirements makes a page eligible, but Google explicitly states that indexing is not guaranteed.

If a sitemap has a Success status but valuable pages remain excluded, the next step is not repeated sitemap submission. Use the Page indexing report and URL Inspection tool to identify whether the cause involves crawling, noindex directives, redirects, duplicate pages, canonical selection, server responses or another indexing decision. You can use the focused guide to investigate page indexing issues.

The supplementary application view below demonstrates how sitemap presence and Google Search Console indexing status can be monitored as separate indicators. It is a real SEOAssistant workflow screenshot captured on October 19, 2026, using the apkomfort.pl example.

SEOAssistant: Sitemap URLs and indexing status (English interface)
SEOAssistant — Sitemap URLs and indexing status

This separation matters because a URL can appear in a sitemap without being indexed, while an indexed URL may have been discovered through internal links rather than the sitemap. Compare the two datasets to find meaningful gaps instead of treating sitemap inclusion as proof of index coverage.

Key Conclusions for Google Search Console Sitemap Management

The most useful conclusions are operational rather than technical. A sitemap should be treated as a controlled inventory of preferred URLs and a diagnostic input, not as an indexing command.

  • Use an XML sitemap to help Google discover important canonical URLs.
  • Do not confuse an XML sitemap with a visitor-facing HTML sitemap.
  • Include URLs that are indexable, canonical and expected to return successful responses.
  • Verify the sitemap before submitting it through the Sitemaps report.
  • Treat Couldn’t fetch as an access problem and reading errors as format or content problems.
  • Use sitemap index files when size limits or useful website segmentation require multiple files.
  • Do not repeatedly submit an unchanged sitemap to force crawling.
  • Use indexing reports for page-level problems because sitemap success is not an indexing result.
  • Maintain strong internal links even when every important URL appears in a sitemap.

Summary: Add a Sitemap to Google Search Console with the Right Expectations

To submit an XML sitemap to Google, first locate or generate a valid file containing the canonical pages you want search engines to discover. Check its accessibility, URL quality, XML structure and size. Then select the correct property in Search Console, open the Sitemaps report, enter the sitemap location and review its processing status.

A Success status confirms that Google could process the file. It does not confirm that every URL is indexed or eligible to rank. If the sitemap works but pages remain absent from search, move the investigation from sitemap processing to crawling, canonicalization, content and indexing signals. For a broader view of the platform and its reports, review the complete Google Search Console guide.

How to Use the URL Inspection Tool in Google Search Console

The Google Search Console URL Inspection tool helps you answer a focused question: what does Google know about this specific URL? It can show information about the indexed version, test the current live page, identify crawl or indexing barriers, and let you request another indexing attempt. The important distinction is that URL Inspection diagnoses one address at a time. It does not replace sitewide indexing reports, technical checks, or a broader SEO review.

What the Google Search Console URL Inspection Tool Does

The URL Inspection tool provides information about an individual page within a Search Console property you can access. You can use it to investigate why a page is not indexed, review Google’s last recorded crawl, test whether the current version is accessible, and check which URL Google selected as canonical.

The tool presents two related but different sources of information:

  • Google Index data describes the version Google last crawled and processed.
  • Live Test data is generated when you ask Google to test the page that is currently available.

This distinction matters whenever you have recently published, updated, redirected, or unblocked a page. The indexed information can still describe an older version, while the live test can confirm whether the latest technical changes are visible to Google.

If you are still learning how the tool fits into the wider platform, start with this Google Search Console guide for beginners. URL Inspection is most useful when you already know which page requires investigation.

How to Inspect a URL in Google Search Console

To inspect a page, open the correct Search Console property and follow this process:

  1. Copy the complete URL you want to inspect, including the protocol and final path.
  2. Paste it into the inspection field at the top of Search Console.
  3. Wait while Search Console retrieves information from the Google index.
  4. Read the main verdict, then expand the page indexing details.
  5. Check the last crawl, page fetch, crawl permission, indexing permission, and canonical fields.
  6. If the page has changed since the recorded crawl, select Test live URL.

The inspected URL must belong to the property currently open in Search Console. Differences between HTTP and HTTPS, subdomains, and URL prefixes can affect whether the address is covered by that property. You can also open URL Inspection from an inspection option shown beside URLs in several Search Console reports.

Always inspect the exact address you want Google to evaluate. A trailing slash, parameter, alternate hostname, or different protocol may represent a separate URL and produce a different result.

How to Read the “URL Is on Google” Result

URL is on Google generally means that the inspected URL has been indexed and may be eligible to appear in Google Search. It does not promise that the page will appear for a particular query, maintain a specific ranking, or be displayed every time you search for its address.

The verdict also does not test every condition that can affect visibility. Manual actions, security concerns, legal removals, temporary removals, and other search policies may need to be checked elsewhere in Search Console.

Details to check even when the URL is indexed

A positive headline is only the starting point. Expand the indexing section and review the supporting information:

  • Last crawl shows when Google collected the information displayed in the indexed view.
  • Page fetch indicates whether Google successfully retrieved the page during that crawl.
  • Crawl allowed shows whether robots.txt permitted access.
  • Indexing allowed indicates whether Google detected a directive that prevented indexing.
  • Google-selected canonical identifies the URL Google treated as the main version.

These fields can reveal a problem hidden behind an apparently positive result. For example, a page may be indexed but Google may have selected a different canonical URL than the one your site declares.

What “URL Is Not on Google” Can Mean

URL is not on Google is a conclusion, not a complete diagnosis. The page may be new, inaccessible, intentionally excluded, treated as a duplicate, or known to Google but not selected for indexing.

Common explanations include:

  • Google does not know the URL yet. The page may have few or no crawlable internal links and may not be included in a sitemap.
  • Crawling is blocked. A robots.txt rule may prevent Google from fetching the page.
  • Indexing is not allowed. The page may contain a noindex directive in its HTML or HTTP response.
  • The page could not be fetched. Server errors, access restrictions, DNS problems, or other availability issues may interrupt the crawl.
  • The URL redirects. Google may process the destination rather than index the original address as a standalone page.
  • Google selected another canonical. The inspected URL may be considered an alternate or duplicate version.
  • The URL was discovered or crawled but is not currently indexed. In this situation, technical accessibility alone does not ensure inclusion.

Expand the page indexing section and use the specific reason shown there to determine your next step. Do not request indexing before resolving a clear block such as noindex, robots.txt restrictions, persistent server errors, or an unintended redirect.

If the same issue affects a template, directory, or substantial group of pages, move from single-page diagnosis to the Page indexing report. A broader report will help you investigate sitewide indexing patterns instead of repeatedly checking isolated examples. Google describes URL Inspection as the tool for a specific page, while the Page indexing report provides a wider view of known URLs.

Indexed Data vs. Test Live URL

The most common URL Inspection mistake is treating indexed data and live test data as if they describe the same moment. They do not.

The Google indexed version

The default view shows information collected during Google’s last recorded crawl and indexing attempt. Check the Last crawl date before drawing conclusions. If you changed the page after that date, the indexed view may still show an old noindex directive, an earlier canonical, a previous HTTP response, or content that is no longer present.

The Test Live URL result

When you select Test live URL, Google fetches the current page and checks whether it appears technically available for indexing. This is useful after correcting a crawl block, removing noindex, repairing a server response, or publishing a substantial update.

A successful live test does not mean the page has already been indexed. It also cannot predict every indexing decision. In particular, the live test does not determine Google’s final canonical selection, confirm sitemap inclusion, or guarantee that the page meets every quality and policy requirement.

Use the two views as a comparison:

  • If the indexed result shows a problem but the live test passes, Google may not have processed your fix yet.
  • If both views show the same problem, the issue is probably still present on the live page.
  • If the indexed view is valid but the live test fails, investigate a new availability or configuration problem before Google crawls the page again.

The live test supports diagnosis. It does not update the Google index by itself.

How to Check Crawl, Indexing, and Canonical Information

A reliable inspection follows a fixed order. Start with access, then check indexing permissions, and only then evaluate canonicalization.

  1. Review the page fetch. Confirm that Google retrieved the page successfully rather than encountering a server, access, or not-found response.
  2. Check whether crawling is allowed. If robots.txt blocks the URL, Google may be unable to inspect the page content and its indexing directives.
  3. Check whether indexing is allowed. If the page returns noindex, remove it only when the URL is genuinely intended for search.
  4. Compare the canonical fields. Review the user-declared canonical and the Google-selected canonical.
  5. Inspect the selected canonical if necessary. Determine whether Google has chosen the correct primary version or whether conflicting signals require correction.

The user-declared canonical is the URL your site presents as its preferred version. It may be communicated through a canonical link element, an HTTP header, a sitemap, or other signals. The Google-selected canonical is the version Google actually chooses after processing the available signals.

These values can differ because a declared canonical is a signal rather than an instruction Google must follow. When they do not match, review redirects, internal links, sitemap URLs, duplicate content, protocol and hostname consistency, and canonical elements. The live test cannot show a final Google-selected canonical because that decision is made during indexing.

How to Review Page Resources and Enhancements

URL Inspection can provide more than a top-level indexing verdict. Depending on the result, you may be able to open the crawled or tested page details and review the returned HTML, HTTP response information, rendered screenshot, loaded resources, and JavaScript output. These details help determine whether Google received the same page that users and site administrators expected.

Resource information is especially useful when essential scripts, stylesheets, images, or API responses fail during rendering. A resource warning is not automatically an indexing failure. Prioritize resources that affect the main content, navigation, canonical information, or structured data rather than treating every blocked decorative file as equally important.

The report may also show detected enhancements or structured data details. Availability depends on the features implemented on the page. A valid enhancement result means the relevant markup passed the reported checks; it does not guarantee that Google will display a rich result.

When and How to Request Indexing

The request indexing Google Search Console option is appropriate for a small number of important new or substantially updated URLs. It is particularly useful after you have confirmed through a live test that a previous technical problem has been corrected.

Use the following sequence:

  1. Inspect the complete URL.
  2. Read the indexed result and identify any reported problem.
  3. Correct the issue on the website.
  4. Run Test live URL to verify the current version.
  5. Select Request indexing if the page is available for indexing.
  6. Allow Google time to recrawl and process the URL.

Submitting the request places the URL into a recrawl process. It does not force immediate crawling, indexing, or ranking. Google applies quotas to individual requests, and repeatedly requesting indexing for the same URL does not make the crawl happen faster.

Before submitting, confirm that the page returns the intended response, is not blocked, allows indexing, uses the correct canonical, and contains content worth indexing. A request cannot compensate for unresolved technical barriers or a page that Google treats as a duplicate.

What to Do After Publishing or Updating a Page

URL Inspection works best as one part of a repeatable publishing process. After making a page live, use the following workflow:

  1. Open the public URL in a browser and confirm that it loads without authentication.
  2. Verify the response, indexability, canonical declaration, and final redirect behavior.
  3. Add crawlable internal links from relevant existing pages.
  4. Include the canonical URL in the appropriate XML sitemap when applicable.
  5. Inspect the URL in Google Search Console.
  6. Run a live test if the indexed view is missing or describes an older version.
  7. Request indexing for a small number of important pages when appropriate.
  8. Return later to confirm whether Google has crawled and processed the update.

For larger batches of new or changed pages, use a sitemap rather than submitting every address individually. An accurate sitemap can help Google discover URLs through a sitemap, although submission does not guarantee that every listed page will be indexed.

Search Console remains the source for inspecting Google’s information about a single URL. When a team manages many pages, a separate monitoring view can complement that diagnosis by organizing sitemap coverage and inspection status across a larger URL set. The following SEOAssistant example illustrates that broader workflow rather than the native single-URL inspection screen.

SEOAssistant: Sitemap URLs and indexing status (English interface)
SEOAssistant — Sitemap URLs and indexing status

Common URL Inspection Misinterpretations

The tool becomes more useful when you separate what it confirms from what it cannot prove. Avoid these common conclusions:

  • “URL is on Google means it will rank.” Indexing creates eligibility for search visibility; it does not establish a ranking position.
  • “A successful live test means the page is indexed.” It means the current page appears accessible and potentially indexable under the conditions tested.
  • “The indexed result describes the current page.” It describes information associated with the recorded crawl, which may predate your latest changes.
  • “Request indexing guarantees inclusion.” It asks Google to revisit the URL but does not control the final indexing decision.
  • “Submitting the request repeatedly will speed it up.” Repeated submissions for the same URL do not create faster crawling.
  • “A different Google-selected canonical is always an error.” Google may have identified a stronger or more consistent version. Investigate the signals before changing the page.
  • “Every non-indexed URL needs to be fixed.” Redirects, duplicate variants, filtered pages, and intentionally excluded content may be correctly absent from the index.
  • “One inspected URL explains a sitewide problem.” A single page is evidence, not a complete sample of an entire template or directory.

A useful interpretation always combines the headline verdict with the crawl date, detailed reason, live result, canonical information, and the intended role of the page.

Key Takeaways

Use these principles when working with the Google Search Console URL Inspection tool:

  • Inspect the exact URL within the correct Search Console property.
  • Treat the Google indexed version and the current live page as separate sources of information.
  • Check the last crawl date before assuming Google has processed a recent change.
  • Review crawl access, indexing permission, page fetch, and canonical selection in that order.
  • Use Test Live URL to verify a fix, not to prove that indexing has occurred.
  • Request indexing only after the page is technically ready.
  • Do not repeat requests in an attempt to accelerate crawling.
  • Use URL Inspection for one page and the Page indexing report for recurring or sitewide patterns.
  • Use sitemaps and internal links to support discovery across larger URL sets.

Summary

The URL Inspection tool is a diagnostic tool, not an indexing switch. Its main value comes from comparing what Google recorded during its previous crawl with what the live page returns now. Begin with the main verdict, verify the last crawl date, examine access and indexing controls, and compare the declared canonical with Google’s selected version.

If the page has changed, test the live URL before requesting indexing. If the same issue appears across many pages, stop inspecting them one by one and move to a sitewide report. This approach turns URL Inspection into a controlled troubleshooting process: identify the current state, verify the cause, implement the fix, test the result, and then allow Google to process the updated page.

Core Web Vitals in Google Search Console: A Beginner’s Guide

The Core Web Vitals report can tell you that real visitors are experiencing slow loading, delayed responses, or unstable layouts. It cannot, by itself, tell you exactly which line of code caused the problem. The practical approach is to use Core Web Vitals in Google Search Console for monitoring and prioritization, then use PageSpeed Insights, Chrome DevTools, and development diagnostics to investigate specific causes.

If Search Console is new to you, start with this complete beginner’s guide to Google Search Console. It explains the platform’s main reports and helps place Core Web Vitals within a broader SEO workflow.

What Are Core Web Vitals?

Core Web Vitals are metrics designed to measure three parts of the real-world page experience: loading performance, responsiveness, and visual stability. The current metrics are Largest Contentful Paint, Interaction to Next Paint, and Cumulative Layout Shift, commonly abbreviated as LCP, INP, and CLS.

The Google Search Console Core Web Vitals report uses anonymized field data from the Chrome User Experience Report, also known as CrUX. Field data comes from actual visits rather than a single simulated test. This makes it useful for understanding what eligible users have experienced across different devices, networks, locations, and page visits.

A good Core Web Vitals assessment is useful for both user experience and search visibility, but it should not be treated as a direct ranking formula. Google’s ranking systems consider many signals, and passing all three metrics does not guarantee that a page will move higher in search results.

LCP, INP, and CLS Explained

LCP measures loading performance

Largest Contentful Paint measures how long it takes for the largest visible image, video poster, or text block in the initial viewport to render. In practical terms, it asks when the page’s main visible content appears useful to the visitor.

An LCP of 2.5 seconds or less is considered Good. A result above 2.5 seconds and up to 4 seconds is classified as Need improvement, while a result above 4 seconds is Poor. These thresholds are evaluated at the 75th percentile, meaning at least 75% of measured visits should meet the target.

INP measures responsiveness

Interaction to Next Paint evaluates how quickly a page provides visual feedback after interactions such as clicks, taps, and keyboard input. It considers interactions throughout the visit and identifies a representative high-latency interaction while excluding certain outliers.

An INP of 200 milliseconds or less is Good. A result above 200 milliseconds and up to 500 milliseconds Needs improvement, while a result above 500 milliseconds is Poor. Slow INP often indicates that JavaScript, rendering work, or other long tasks are preventing the browser from responding promptly.

CLS measures visual stability

Cumulative Layout Shift measures unexpected movement of visible page elements. A common example is a button moving just as a visitor attempts to tap it because an image, advertisement, banner, or other element has loaded above it.

A CLS score of 0.1 or less is Good. A result above 0.1 and up to 0.25 Needs improvement, while a result above 0.25 is Poor. Unlike LCP and INP, CLS is a unitless score rather than a duration.

How to Open the Core Web Vitals Report

You need a verified Search Console property before you can review its reports. Once you have access, use the following process:

  1. Sign in to Google Search Console.
  2. Select the correct website property.
  3. Open Core Web Vitals from the navigation menu.
  4. Review the separate Mobile and Desktop summaries.
  5. Select Open report for the device type you want to investigate.
  6. Choose a status or issue row to view affected URL groups and examples.

The overview is intended to reveal site-level patterns. It is not designed as a lookup tool for every individual page, and the number of URLs shown may be lower than the total number of pages on your website.

Good, Need Improvement, and Poor URL Groups

Search Console places measured URL groups into three statuses. Understanding these labels prevents you from treating every warning as equally urgent.

  • Good: the group meets the recommended thresholds for LCP, INP, and CLS.
  • Need improvement: at least one metric falls between the Good and Poor thresholds.
  • Poor: at least one metric exceeds the Poor threshold.

The group’s overall status is determined by its weakest qualifying metric. A group with Good LCP and INP but Poor CLS is therefore classified as Poor. Mobile and desktop results are assessed separately.

When prioritizing poor URLs in Google Search Console, begin with problems affecting important pages or large groups. Poor issues normally deserve attention before Need improvement issues, but business impact still matters. A problem affecting a key product, lead-generation, or checkout template may be more urgent than a larger issue affecting low-value pages.

Mobile and Desktop Reports

Mobile and desktop visitors use different hardware, viewport sizes, network connections, and interaction methods. Search Console therefore creates separate reports for the two device types. A URL group can be Good on desktop and Poor on mobile without any contradiction.

Do not assume that a desktop pass offsets a mobile failure. Open both reports and compare the affected metrics, URL groups, and trends independently. If most customers use mobile devices, mobile problems may deserve the first development resources, but your decision should be based on audience and business data rather than the report label alone.

A missing device report does not mean that the pages have passed. It may simply mean that CrUX does not have enough eligible field data to produce a meaningful result for that device type.

Why Google Search Console Groups Similar URLs

Search Console groups URLs that appear to provide a similar experience and may share a common framework. This is valuable because performance problems often come from reusable templates, components, scripts, or media rules rather than isolated pages.

For example, if many product pages use the same oversized hero image component, they may share an LCP issue. If all category pages inject a banner without reserving space, they may share a CLS issue. Correcting the shared component can improve the entire group more reliably than editing example URLs one at a time.

The URL displayed in an issue table is a representative example, not necessarily the only affected page. Some URLs in a group may perform better or worse than the reported group value. If a specific group lacks sufficient information, Search Console may use aggregated origin-level data instead.

How to Investigate a Core Web Vitals Issue

A disciplined investigation separates the observed field-data problem from its technical cause. Use the Search Console group as a starting point, not as a diagnosis.

  1. Choose the device report. Confirm whether the issue affects mobile, desktop, or both.
  2. Identify the failing metric. Determine whether you are investigating loading, responsiveness, or layout stability.
  3. Review the URL group. Look for a shared template, page type, media component, script, banner, or third-party feature.
  4. Select representative examples. Test more than one page so that an unusual URL does not distort the investigation.
  5. Run PageSpeed Insights. Compare available field data with the controlled Lighthouse diagnostics.
  6. Reproduce the problem. Use Chrome DevTools and realistic interactions, especially for INP and post-load CLS issues.
  7. Implement a template-level fix. Correct the shared cause when the evidence indicates that the problem affects a group.
  8. Test before deployment. Check affected pages on relevant device sizes and important user journeys.

If you need to verify Google’s indexed information, canonical selection, or access to a specific page, you can inspect an affected URL. However, URL Inspection is not a Core Web Vitals debugging tool and should not replace performance diagnostics.

Google Search Console vs. PageSpeed Insights

Search Console and PageSpeed Insights answer related but different questions. Search Console asks, “Which parts of the website have shown persistent real-user problems?” PageSpeed Insights helps ask, “What field and laboratory evidence is available for this particular page, and what may be causing its performance?”

Search Console combines field data into similar URL groups. PageSpeed Insights generally analyzes an individual URL and can show both CrUX field data and Lighthouse laboratory data. Field data reflects real visits over a rolling period, while lab data is produced in a controlled test and is useful for repeatable diagnosis.

The results do not always match. A tested page may be an outlier within its Search Console group, and a Lighthouse test may run under conditions that differ from those experienced by your visitors. A strong lab result also cannot immediately erase historical field data.

Use Search Console to identify scope and priority. Use PageSpeed Insights and development tools to identify probable causes, test changes, and compare results under controlled conditions.

Common Ways to Improve LCP, INP, and CLS

There is no universal Core Web Vitals fix. The correct change depends on the metric, the page architecture, and the evidence gathered during testing. The following actions are common starting points rather than guaranteed solutions.

How to improve LCP

LCP optimization usually requires you to identify the LCP element and examine the complete sequence needed to display it. Server delays, late resource discovery, slow downloads, render-blocking resources, and main-thread work can all contribute to the final result.

  • Improve server response times and use appropriate caching.
  • Compress and correctly size important images.
  • Serve modern image formats when they are appropriate for the content.
  • Make the LCP resource discoverable early in the initial HTML.
  • Avoid unnecessarily lazy-loading an above-the-fold LCP image.
  • Reduce render-blocking CSS and synchronous scripts.
  • Remove avoidable redirects in the page-loading path.
  • Use a content delivery network when geographic delivery is a significant bottleneck.

Do not reduce image quality blindly or preload every large resource. Excessive preloading can create competition for bandwidth. Prioritize the resource that actually controls the page’s largest visible content.

How to improve INP

INP problems often occur when the browser’s main thread is busy when the visitor interacts with the page. Improvement therefore depends on identifying the slow interaction and separating input delay, event-processing time, and rendering delay.

  • Reduce unnecessary JavaScript execution.
  • Break long tasks into smaller units of work.
  • Keep event handlers focused and efficient.
  • Delay nonessential scripts until they are needed.
  • Review third-party widgets, tags, and tracking code.
  • Avoid excessive rendering work after an interaction.
  • Test interactions while the page is still loading.
  • Consider field monitoring when laboratory tests cannot reproduce the issue.

INP is not limited to initial page load. Menus, filters, forms, product selectors, search interfaces, and other controls should be tested throughout a realistic visit.

How to improve CLS

CLS improvement is mainly about reserving space and preventing unexpected movement. Common causes include images without dimensions, dynamic embeds, advertisements, injected content, and font-related changes.

  • Define width and height information for images and videos.
  • Reserve stable space for advertisements, embeds, and iframes.
  • Avoid inserting content above existing content without user action.
  • Use placeholders for components that load asynchronously.
  • Review cookie notices, promotional banners, and consent interfaces.
  • Configure web fonts to reduce disruptive text reflow.
  • Test scrolling, navigation, filtering, and other post-load actions.

A page can appear stable during a brief loading test but shift later as the visitor scrolls or interacts. Test the complete journey, not only the first visible screen.

How to Validate a Core Web Vitals Fix

Validation should begin only after the relevant issue has been fixed across the affected group. If the cause is a shared template or component, confirm that the corrected version has reached all applicable URLs before starting Search Console tracking.

  1. Test representative pages with PageSpeed Insights and development tools.
  2. Check both mobile and desktop where the change applies.
  3. Verify that the original technical cause is no longer reproduced.
  4. Deploy the change to all affected pages.
  5. Open the issue details in the Search Console Core Web Vitals report.
  6. Select Start Tracking to begin monitoring the issue.
  7. Review the validation status and investigate any remaining examples.

Search Console uses a 28-day monitoring period to evaluate whether the issue remains present in field data. Starting tracking does not request indexing, run an immediate speed test, or force Google to recrawl the pages. It starts a monitoring process based on incoming CrUX data.

Because field data is historical and aggregated, you may see a delay between deploying a successful fix and seeing the report improve. A fast laboratory test is encouraging evidence, but it is not the same as a completed real-user validation.

Limitations of the Core Web Vitals Report

The report is valuable when its scope is understood. Treating it as a complete performance audit can lead to incorrect conclusions.

  • It does not include every URL on the website.
  • Only indexed URLs are eligible to appear.
  • Low-traffic pages may not have enough field data.
  • Example URLs represent groups rather than isolated diagnoses.
  • Aggregated values may hide differences between visitors and individual pages.
  • The report identifies affected metrics but not every technical cause.
  • Improvements take time to appear because the data covers a rolling period.
  • A Good result does not prove that every user has a fast experience.
  • Passing Core Web Vitals does not guarantee higher rankings.

Search Console also assigns field data to the URL users actually visited, rather than always consolidating it under the canonical URL. Consequently, performance reporting may not align exactly with reports that organize information around Google-selected canonical pages.

Key Conclusions

The most useful way to apply the report is as part of a repeatable monitoring and diagnostic process. Keep the following conclusions in mind:

  • LCP, INP, and CLS measure loading performance, responsiveness, and visual stability.
  • Search Console relies on real-user field data, not a single live performance test.
  • No data does not mean that a URL has passed the assessment.
  • URL groups can reveal shared template and component problems.
  • Mobile and desktop reports should be evaluated independently.
  • PageSpeed Insights and developer tools are needed to investigate probable causes.
  • Validation measures new field data over time and does not trigger reindexing.
  • Core Web Vitals should be improved for users, not treated as a guaranteed ranking shortcut.

Summary

The Core Web Vitals Google Search Console report helps you identify persistent performance problems experienced by real visitors. Begin with Poor groups, determine which metric is failing, and look for shared templates or components. Then test representative URLs with PageSpeed Insights and development diagnostics before implementing a sitewide fix.

The decision rule is simple: use Search Console to establish where and how widely a problem occurs, use diagnostic tools to establish why it occurs, and use field-data validation to establish whether the deployed improvement works for real users. That process is more reliable than chasing a single score or assuming that one passing test represents the entire website.

How to Measure SEO-Driven Leads and Revenue

Organic traffic is useful only when it can be connected to outcomes that matter: qualified leads, completed purchases, signed contracts, retained customers, and contribution profit. Learning how to measure SEO revenue therefore requires more than checking sessions or ranking reports. You need a measurement system that follows a visitor from search discovery through conversion, qualification, sale, and, where relevant, recurring revenue.

No attribution system captures every customer journey perfectly. Privacy choices, device changes, offline conversations, long sales cycles, and incomplete CRM records all create gaps. The goal is not false precision. It is a consistent, documented method that shows what is directly observed, what is attributed by a model, and what remains unknown. These measured results can then help you use measured results to determine what SEO is worth for your company.

What Counts as an SEO-Driven Lead or Sale?

An SEO-driven conversion begins with measurable exposure to an unpaid search result, but the appropriate definition depends on the attribution question. A customer may convert during the same organic session, return directly several days later, or interact with email and paid advertising before buying.

For practical reporting, separate organic outcomes into three categories:

  • Direct organic conversions: the lead or purchase occurs during a session classified as organic search.
  • Organic-assisted conversions: organic search appears earlier in the measurable conversion path, but another channel receives final credit.
  • SEO-influenced offline conversions: an organic visit produces a form submission, phone call, appointment, or account record that later becomes revenue outside the website.

These categories should not be added together without checking for overlap. A purchase may appear as a direct organic conversion in one report and as an organic-assisted conversion in another. The labels explain SEO’s role; they do not necessarily represent separate customers or additional revenue.

The Difference Between Tracking and Attribution

Tracking records an action. It tells you that a form was submitted, a call occurred, a transaction was completed, or a CRM opportunity became closed-won. Attribution applies rules or models to decide which marketing interaction receives credit for that action.

A purchase connected to several marketing touchpoints with credit distributed among them.

This distinction matters because reliable tracking can still produce different attribution results. In Google Analytics, first-user, session, and event-scoped traffic-source dimensions answer different questions. First-user dimensions describe how a user was initially acquired, session dimensions describe the source of a particular visit, and event-scoped dimensions are used to assign credit for key events under the selected attribution model.

Reports should therefore state whether revenue is based on first-touch organic acquisition, organic sessions, last-click credit, or a multi-touch model. Google Analytics currently supports paid-and-organic data-driven attribution and last-click options for event-scoped reporting. Changing the model can change the amount of revenue or fractional conversion credit assigned to a channel without changing the underlying transactions.

Define the Conversions That Have Business Value

Before implementing SEO conversion tracking, define which actions indicate real commercial progress. Counting every button click, page view, file download, or unverified form submission as a conversion inflates performance without demonstrating business value.

A useful conversion hierarchy may include:

  1. Engagement actions: product views, pricing-page visits, account creation, or meaningful content engagement.
  2. Initial inquiries: completed forms, calls, chats, consultation requests, or appointment bookings.
  3. Qualified outcomes: sales-accepted leads, verified opportunities, checkout completions, or approved applications.
  4. Revenue outcomes: paid orders, signed contracts, collected invoices, subscriptions, renewals, or repeat purchases.

Keep engagement indicators separate from primary commercial conversions. A pricing-page visit may help diagnose visitor intent, but it should not carry the same value as a qualified opportunity. Google Analytics provides recommended lead-generation events such as generate_lead, qualify_lead, and close_convert_lead, allowing a company to represent stages beyond the initial inquiry.

Track Organic Search Conversions in Analytics

To measure organic search conversions, configure analytics events around confirmed user actions rather than page loads alone. A form event should fire only after a successful submission. A purchase event should be sent after the order system confirms the transaction. If users can reload a confirmation page, the implementation must prevent that reload from creating additional conversions.

At minimum, record the event name, timestamp, landing page, page location, session source and medium, relevant campaign data, and a non-personally identifiable lead or transaction reference. Mark the commercially important events as key events, then examine them using session-scoped organic traffic and event-scoped attribution reports. Google Analytics records key events when the underlying event occurs and allows the reporting attribution model and lookback window to be configured.

Test the implementation before trusting the reports. Submit forms, complete test orders, use multiple devices where practical, and confirm that each business action produces the expected event exactly once. Recheck tracking after website releases, checkout changes, consent-banner updates, or form-provider migrations.

Connect Form Submissions and Calls to Qualified Leads

A submission is not automatically a lead, and a lead is not automatically revenue. Spam, job applications, support requests, duplicate inquiries, and prospects outside your service area can all increase organic lead counts without improving sales performance.

Form and phone inquiries being filtered into qualified leads, opportunities, and customers.

To track SEO leads accurately, assign every inquiry a unique lead identifier and preserve its original landing page, source, medium, timestamp, and available session identifier. Pass that information into the CRM or lead-management system. Sales teams should then record whether the inquiry was valid, qualified, accepted, converted into an opportunity, won, or lost.

Phone measurement requires the same discipline. A call-tracking setup should connect the call to the visitor session while retaining a unique call record. Duration can help with screening, but it is not proof of quality. A short call may create a valuable appointment, while a long call may be irrelevant. Qualification should be based on the actual outcome recorded by the team handling the call.

The resulting funnel should show the progression from organic inquiries to qualified leads, opportunities, customers, and revenue. If organic search creates 100 inquiries but only 20 are qualified, financial analysis should use the 20 qualified leads and their close rate rather than treating all 100 submissions as equally valuable.

Connect Ecommerce Transactions to Organic Landing Pages

Ecommerce measurement should send a confirmed purchase event containing the order identifier, transaction value, currency, and relevant item data. Google’s ecommerce implementation guidance recommends using the purchase event and including transaction-level information such as transaction_id, value, and currency.

The unique order identifier is essential. Google Analytics uses transaction IDs to deduplicate web purchase events, helping prevent the same order from being counted repeatedly if an event fires more than once. The identifier must be unique for each order and must not contain information that identifies the customer.

When analyzing SEO revenue, retain the organic landing page associated with the relevant visit. This lets you compare revenue generated by product pages, category pages, location pages, articles, and other organic entry points. However, landing-page revenue should be interpreted alongside attribution scope. A page may have started the relationship even when a later direct or email session completed the purchase.

Reconcile analytics transactions with the commerce platform. Differences may result from refunds, canceled orders, tax and shipping treatment, tracking prevention, consent status, or implementation errors. Decide whether your SEO revenue report uses gross order value, net sales after refunds, or contribution after variable costs, and label the metric clearly.

Import Offline Sales and CRM Outcomes

For service companies, business-to-business organizations, and other businesses with delayed sales, website analytics captures only the beginning of the customer journey. The financial outcome may occur after calls, demonstrations, proposals, credit checks, in-person visits, or negotiations.

The CRM should store a durable connection between the initial inquiry and its eventual outcome. Useful fields include the lead identifier, original source and medium, organic landing page, lead date, qualification date, opportunity stage, close date, recorded revenue, expected recurring value, and loss reason.

Server-to-server or offline events can then return important outcomes to the analytics environment. Google Analytics Measurement Protocol supports sending offline and server-side interactions and can connect them to online activity using identifiers such as a client ID or user ID. Google describes this method as a supplement to normal website or app tagging, not a replacement for it.

Only import outcomes that have clear definitions. A signed contract, paid invoice, or closed-won opportunity is more useful than an ambiguous status such as “contacted.” If reported revenue changes after cancellation, partial payment, or contract expansion, establish whether the dashboard will use booked revenue, collected revenue, or recognized revenue.

Measure Assisted and Multi-Session Conversions

Many customers do not convert during their first organic visit. They may discover an informational page, return through another search, subscribe to email, click a retargeting ad, and later purchase directly. A session-only report can miss SEO’s early influence, while first-touch reporting can give SEO too much credit for revenue that required substantial support from other channels.

A customer reaches a purchase through search and several later interactions.

Use conversion-path and attribution reports to examine where organic search appears in multi-session journeys. Compare at least two views: organic last-click or session revenue, and organic-assisted or data-driven credit. Because data-driven attribution can distribute fractional credit among contributing interactions, its totals may look different from reports that award the entire conversion to one channel.

Do not choose whichever model produces the largest SEO number. Select a primary model based on the business question, use it consistently, and provide secondary views for context. For example, session-based organic revenue can support operational reporting, while a multi-touch model can help evaluate SEO’s broader role in customer acquisition.

Distinguish Branded From Non-Branded Organic Performance

Someone searching for your company name already knows the brand. Someone searching for a product, service, problem, or comparison without mentioning the brand may represent incremental market discovery. Combining these groups can make SEO growth appear stronger than it is, particularly when offline advertising, public relations, referrals, or paid campaigns are increasing branded demand.

Segment organic search performance into branded and non-branded groups wherever the available query data permits. The branded set should include company names, domains, product brands owned by the company, and common misspellings. Review the definitions regularly as the business introduces new names or offerings.

Google Search Console provides search performance data, and its Insights reporting can classify branded and non-branded queries for eligible properties. Google notes that this classification is AI-powered and may mislabel queries, so important business reporting should still be reviewed against a company-specific brand list. Search Console may also omit anonymized queries, meaning branded share can be estimated but not always measured with complete precision.

Non-branded performance is often the more useful indicator of SEO reaching people who were not already looking for the company. Branded traffic still matters, but it should be reported separately rather than presented as entirely incremental SEO-created demand.

Assign Values to Leads When Revenue Is Delayed

If revenue arrives months after the initial inquiry, use a lead-value model until enough closed-sale data is available. The simplest expected-value calculation is:

Expected lead value = qualification rate × qualified-lead close rate × average contribution per new customer

Suppose 40% of tracked organic inquiries become qualified leads, 25% of qualified leads become customers, and an average new customer produces $4,000 in first-year contribution. The expected value of an initial organic inquiry would be $400. This is a planning estimate, not recorded revenue.

Use contribution or gross profit when the objective is investment analysis. Top-line revenue can exaggerate value when delivery, inventory, commissions, refunds, and other variable costs are substantial. Segment values by lead type, service line, geography, or customer tier when their economics differ materially.

Replace estimated lead values with actual CRM revenue as cohorts mature. Never count both the estimated value and the eventual closed revenue for the same lead in a cumulative total. The estimate is a temporary proxy for a delayed outcome, not a second source of value.

Build an SEO Revenue Measurement Dashboard

An effective dashboard combines search visibility, website behavior, lead quality, ecommerce transactions, and CRM revenue. It should allow decision-makers to move from an overall financial result to the landing pages, search themes, and funnel stages responsible for it.

A practical dashboard should include:

  • Organic sessions and engaged sessions.
  • Organic landing pages and their conversion rates.
  • Branded and non-branded search clicks where data is available.
  • Form submissions, calls, and other initial inquiries.
  • Qualified leads, opportunities, and customers.
  • Ecommerce transaction revenue and refunds.
  • Closed-won or collected offline revenue.
  • Expected lead value for immature cohorts.
  • First-touch, session-based, and selected attribution-model results.
  • Unmatched CRM records and unattributed conversions.
  • SEO costs for the same reporting period.

The dashboard should identify the measurement period, attribution model, revenue definition, lookback assumptions, and date of the latest CRM update. Combine this commercial reporting with appropriate SEO performance monitoring capabilities so teams can connect changes in visibility and landing-page performance with qualified leads and recorded revenue.

Do not mix immature and mature cohorts without labeling them. Leads generated last week may not have had enough time to become customers, while leads from six months ago may provide a reliable close rate. Cohort reporting prevents recent SEO activity from looking unproductive simply because the normal sales cycle is incomplete.

Avoid Double-Counting Revenue Across Channels

Marketing platforms frequently claim credit independently. Analytics, advertising platforms, affiliate systems, email software, and CRM reports may each attribute the same order to their own interaction. Adding channel-reported revenue together can therefore produce a total greater than the company’s actual sales.

Multiple channel claims for one order are reconciled into a single revenue record.

Start with a reconciled source of truth, such as paid ecommerce orders or closed CRM opportunities. Each order or opportunity should have one unique identifier. Attribution models may allocate that revenue among channels, but the allocated total should reconcile with the underlying eligible revenue.

Common double-counting errors include adding assisted revenue to last-click revenue, counting an inquiry value and closed-sale value for the same lead, importing the same CRM sale more than once, and treating repeat purchases as both new-customer acquisition revenue and lifetime value.

Cross-channel comparison also requires consistent assumptions. An illustrative SEO and Google Ads revenue model is useful only when both channels use compatible revenue definitions, time horizons, and attribution rules.

How to Improve SEO Revenue Attribution Confidence Over Time

Attribution confidence improves when measurement is treated as an operational process rather than a one-time analytics project. Begin with a documented event and data specification, then assign ownership for website tracking, CRM data quality, call outcomes, order reconciliation, and dashboard maintenance.

A useful improvement cycle is:

  1. Test every important event and confirm that it fires once at the correct moment.
  2. Reconcile online transactions with the order-management system.
  3. Measure the percentage of leads carrying usable source and landing-page data.
  4. Audit whether sales teams consistently update qualification and revenue fields.
  5. Review unmatched, direct, unknown, and unattributed outcomes.
  6. Compare attribution models without changing the primary reporting method arbitrarily.
  7. Update lead-value assumptions using mature customer cohorts.
  8. Document tracking changes so reporting discontinuities are visible.

Privacy settings and technical limitations mean that some conversions will remain unobserved or modeled. Google Analytics may include modeled key events when direct observation is limited, and attributed data can continue updating after the initial conversion date. Reports should disclose modeled, delayed, and unattributed components instead of presenting every figure as directly measured revenue.

Confidence can also be strengthened with controlled experiments, geographic comparisons, landing-page tests, and analysis of non-branded growth. Attribution describes how measured credit is distributed; it does not by itself prove that every attributed sale was caused by SEO. Incrementality should be evaluated separately when the investment decision requires stronger evidence.

Key Conclusions for Measuring SEO Revenue

A defensible measurement framework focuses on business outcomes while making uncertainty visible. The most important conclusions are:

  • Organic traffic is an input, not a financial outcome.
  • Tracking records conversions, while attribution determines how credit is assigned.
  • Lead reporting must include qualification, close rate, and actual customer value.
  • Ecommerce purchases require unique transaction identifiers and reconciliation with order data.
  • CRM and offline conversion records are essential when the sale happens after the website visit.
  • Branded and non-branded organic performance should be evaluated separately.
  • Estimated lead value should be replaced by actual revenue as cohorts mature.
  • Assisted conversions must not be added to last-click revenue without checking for overlap.
  • Every report should identify its attribution model, measurement period, and revenue definition.
  • Missing and unattributed conversions should be disclosed rather than hidden.

Summary: How to Measure SEO-Driven Leads and Revenue

The best answer to how to measure SEO revenue is a connected system: search and landing-page data identify organic discovery, analytics records meaningful website actions, call and form tracking create durable lead records, the CRM supplies qualification and closed-sale outcomes, and a documented attribution model assigns credit without exceeding actual company revenue.

Start with the outcomes you can verify, improve data quality over time, and report estimates separately from recorded sales. Once attributable economic value and complete costs are available, you can apply measured revenue in an SEO ROI calculation. This evidence also makes it easier to decide when SEO is worth the investment without relying on rankings, traffic, or lead totals in isolation.

What Is SEO Worth for My Company? A Practical ROI Guide

Asking “what is SEO worth for my company?” is not the same as asking how much traffic SEO could generate. Traffic has financial value only when it reaches the right audience, produces measurable business outcomes, and creates enough contribution to recover the full investment. A useful estimate must therefore connect search demand with achievable visibility, qualified visits, conversion rates, customer economics, costs, and the time required to generate results.

This guide presents a practical framework for estimating the SEO value for a business without treating forecasts as guarantees. It also explains the differences between potential value, realized return, break-even performance, and revenue attribution.

What Does It Mean to Ask, “What Is SEO Worth for My Company?”

The value of SEO is the economic benefit your company could reasonably obtain by increasing its visibility in relevant organic search results. Depending on your business model, that benefit may come from ecommerce sales, qualified leads, subscriptions, bookings, store visits, or another measurable conversion.

The important word is relevant. Ranking for high-volume searches has limited business value if those searches do not match your products, services, locations, or customer intent. A smaller group of commercially relevant queries can be worth more than a large volume of poorly qualified traffic.

SEO value should usually be expressed as a range rather than one guaranteed revenue number. Search rankings, click-through rates, conversion rates, competition, implementation speed, and customer demand can all differ from the assumptions used in a forecast. Google also makes clear that SEO improvements do not automatically guarantee top rankings and that changes can take different amounts of time to affect search visibility.

The financial question is therefore not simply whether SEO can work. It is whether the realistic opportunity is large enough, profitable enough, and strategically suitable for your company. A separate assessment of when SEO is worth the investment can help you evaluate that broader decision.

The Difference Between Potential Value and Realized SEO ROI

Potential value and realized ROI are related, but they answer different questions.

Potential SEO value

Potential value is a forward-looking estimate. It uses assumptions about available search demand, achievable rankings, expected organic clicks, conversion rates, and customer value. It is primarily useful before approving an SEO budget or when comparing different investment levels.

Realized SEO return on investment

Realized ROI is calculated after the work has begun and measurable results exist. It compares the economic gain attributed to SEO with the complete cost of producing that gain.

A practical formula is:

SEO ROI = (SEO-attributable profit minus total SEO costs) divided by total SEO costs, multiplied by 100

For example, if SEO produces $75,000 in attributable contribution and costs $50,000 over the same measurement period, the net gain is $25,000. The resulting ROI is 50%.

This calculation should specify whether “profit” means gross profit, contribution margin, or another financial measure. Using revenue in place of profit can make the return look stronger than it actually is. Once performance data is available, use a consistent method to calculate realized SEO ROI.

Break-even performance

Break-even analysis works backward from cost. It calculates the number of sales, leads, conversions, or organic visits required to recover the investment. It is a target-setting and risk-control tool rather than a forecast of what SEO will necessarily deliver.

Attributed revenue

Attributed revenue is the value assigned to organic search under a defined analytics model. It does not automatically prove that every recorded organic conversion was created incrementally by the SEO program. Some customers may have found the company through another channel before returning through search.

The Inputs That Determine SEO’s Financial Value

A defensible estimate depends on a small number of documented inputs. Weak assumptions in any one of them can materially change the result.

SEO traffic narrowing into conversions and financial contribution, with time and cost represented beside the funnel.

Addressable search demand

Addressable demand is the portion of search activity that your company could realistically serve. It should exclude irrelevant locations, informational topics with no strategic role, products you do not offer, and queries dominated by a different type of search result.

Achievable organic traffic

Search volume is not the same as potential website traffic. Your estimate must account for achievable rankings, expected click-through rates, competition, search intent, existing authority, and the types of results displayed for each query.

For an established website, existing impressions, clicks, queries, pages, and average positions can provide a stronger baseline than third-party search volume alone. Search Console reports impressions and clicks from Google Search and allows performance to be reviewed by dimensions such as query, page, country, and date.

Conversion rate

The relevant rate is the percentage of organic visits that become valuable business outcomes. Informational visitors, product researchers, local prospects, and buyers may convert at very different rates, so using one site-wide average can distort the estimate.

Value per conversion

For ecommerce, this may be average contribution per order. For lead generation, it can be calculated from qualified lead rate, close rate, and contribution per new customer. Subscription businesses may use an appropriately conservative expected customer value.

Time to results

A mature monthly traffic estimate should not be applied to every month from the beginning of the project. Forecasts need a ramp-up assumption that reflects implementation time, indexing, ranking development, content production, and conversion optimization.

Complete SEO cost

The business case should include external fees and internal resources. Omitting implementation or employee time can turn an unprofitable initiative into an apparently attractive one on paper.

A Simple Framework to Estimate the Value of SEO

You can estimate the value of SEO by connecting traffic potential to contribution rather than treating rankings as the final outcome.

Expected organic conversions = qualified organic visits multiplied by conversion rate

Expected contribution = organic conversions multiplied by contribution per conversion

Forecast net value = expected contribution minus total SEO costs

Forecast ROI = forecast net value divided by total SEO costs, multiplied by 100

Illustrative example

Suppose a company estimates that its SEO program could eventually attract 4,000 qualified organic visits per month. If 2.5% of those visits convert, the company would generate 100 conversions per month. At an average contribution of $120 per conversion, mature monthly contribution would be $12,000.

That does not mean the first-year contribution should automatically be forecast at $144,000. If the expected ramp means the company averages 50% of mature performance during the first year, the adjusted contribution would be:

$12,000 multiplied by 12 months multiplied by 50% = $72,000

If the complete first-year SEO cost is $48,000, the forecast net value would be $24,000 and the forecast ROI would be 50%.

This is an illustrative calculation, not a performance promise. Each input should be replaced with company-specific evidence. For a more detailed process, see how to forecast SEO revenue before investing.

How SEO Costs Affect the Business Case

When companies ask how much SEO is worth, they often compare projected revenue with an agency retainer or software subscription. That approach can understate the true investment.

A complete cost model may include:

  • SEO consulting, agency, or specialist fees
  • Content research, writing, editing, and design
  • Development and technical implementation
  • Analytics, reporting, crawling, and research tools
  • Digital PR or other legitimate promotion work
  • Internal management and stakeholder time
  • Product, legal, compliance, or subject-matter review
  • Conversion optimization for organic landing pages
  • Ongoing maintenance and content updates

Timing matters as much as the total. Upfront audits, migrations, templates, or platform improvements may create a high initial cost, while content production and monitoring continue monthly. A business case should show both cumulative investment and ongoing operating cost.

SEO should also be compared with realistic alternatives. Paid search may produce traffic sooner but requires continued media spending, while SEO usually requires more time and implementation before reaching meaningful scale. Reviewing SEO and Google Ads over a 24-month period can make the different cost and value patterns easier to compare.

How Long-Term Value Changes the Calculation

SEO assets can continue attracting visitors after their initial production period, but their future value should not be treated as permanent or cost-free. Rankings may change, competitors may improve their pages, customer behavior may shift, and content may require maintenance.

A long-term model should calculate value by period. For example, forecast year one, year two, and year three separately, with assumptions for growth, retention, decline, maintenance cost, and conversion performance.

For repeat-purchase or subscription businesses, customer lifetime value can materially increase the economic case. However, only the expected contribution from the relevant customer cohort should be counted. Avoid adding both initial revenue and full lifetime value if the latter already includes the initial transaction.

Long-term forecasting should also distinguish between new SEO-generated customers and existing customers who return through a branded search. Both may appear as organic traffic, but they do not necessarily represent the same level of incremental value.

How to Find Your SEO Break-Even Point

Break-even analysis translates an SEO budget into a measurable minimum performance requirement. It helps management decide whether the required result appears realistic.

A balanced scale showing equal SEO costs and customer contribution at break-even.

Break-even conversions = total SEO cost divided by contribution per conversion

If a program costs $60,000 and each completed sale contributes $300, the program requires 200 attributable sales to recover its cost.

For a lead-generation company, first estimate contribution per lead:

Contribution per lead = qualification rate multiplied by close rate multiplied by contribution per customer

If 60% of leads are qualified, 20% of qualified leads become customers, and each customer contributes $5,000, the expected contribution per initial lead is $600.

60% multiplied by 20% multiplied by $5,000 = $600

A $60,000 investment would therefore require 100 leads with the same expected quality and close-rate assumptions.

You can then work backward to traffic:

Break-even organic visits = required conversions divided by organic conversion rate

Monthly operating break-even and cumulative investment recovery should be reported separately. A program may cover its current monthly cost before it has recovered the earlier setup and production investment. Use the dedicated framework to calculate your SEO break-even point.

How to Measure Revenue Generated by Organic Search

Measurement should connect search visibility with qualified business outcomes. Rankings and traffic help explain performance, but neither metric is revenue.

A tracked journey from organic search through a website conversion and sales pipeline to completed revenue.

A practical measurement process should connect:

  • Search impressions and clicks
  • Organic landing pages and sessions
  • Forms, calls, purchases, bookings, or sign-ups
  • Lead qualification and sales pipeline stages
  • Completed revenue, refunds, cancellations, and contribution
  • Repeat purchases or recurring revenue where applicable

Ecommerce companies can connect transaction data with organic landing pages and acquisition reports. Lead-generation businesses usually need CRM integration, call tracking, and offline sales outcomes because the website submission is not the final source of revenue.

Attribution must also be defined. Analytics platforms can assign different amounts of conversion credit depending on the selected model. For example, last-click attribution credits the final eligible channel, while data-driven attribution can distribute credit across multiple marketing interactions.

Reports should state the attribution model, measurement period, lookback settings, and treatment of branded traffic. This prevents stakeholders from interpreting attributed organic revenue as perfectly proven incremental revenue. A detailed implementation guide can help you measure SEO-driven leads and revenue.

Three SEO Value Scenarios: Conservative, Expected, and Optimistic

A single forecast hides uncertainty. Scenario modeling makes assumptions visible and shows whether the investment remains acceptable when performance is weaker than expected.

Three growth curves showing conservative, expected, and optimistic SEO performance paths.

Conservative scenario

Use lower ranking and click-through assumptions, slower implementation, a longer ramp-up period, and a conversion rate below the current benchmark. This scenario should represent a credible downside case rather than an artificially negative result.

Expected scenario

Use the assumptions best supported by your existing search, analytics, sales, and competitive data. The expected scenario should not automatically sit halfway between the other two scenarios. It should represent the outcome management considers most defensible.

Optimistic scenario

Use stronger but still plausible assumptions for visibility, traffic, conversion, implementation speed, and customer value. Do not assume top rankings for every target query or immediate mature performance.

Each scenario should use the same calculation structure. Change the uncertain inputs rather than changing the financial logic. It is particularly useful to test traffic, conversion rate, contribution per conversion, cost, and ramp-up time independently so decision-makers can see which assumption creates the greatest risk.

Financial Value SEO Models Often Miss

Direct conversions should remain the foundation of an SEO return on investment calculation. SEO may also produce additional benefits, but these should be reported separately unless they can be measured reliably.

Potential secondary benefits include:

  • Greater visibility during product or supplier research
  • More branded searches after customers discover the company
  • Content that supports sales conversations and customer education
  • Reusable research for email, social media, advertising, and sales materials
  • Improved understanding of customer questions and demand
  • Reduced dependence on a single acquisition channel
  • Better website structure, navigation, usability, and technical quality

These benefits can strengthen the business case, but assigning them arbitrary monetary values will inflate the forecast. Present them as strategic or operational benefits unless a documented method connects them to incremental financial performance.

When the Numbers Are Too Uncertain to Justify a Large Investment

Not every company has enough evidence to support a large SEO commitment. A smaller validation phase may be more appropriate when the assumptions are wide or the cost of being wrong is high.

Warning signs include:

  • Little evidence of relevant search demand
  • No reliable conversion or sales data
  • Unclear margins or customer contribution
  • Limited ability to implement technical recommendations
  • Long approval processes that could delay content publication
  • A website or product likely to change substantially
  • Strong competition without a credible differentiation strategy
  • Dependence on a small number of highly uncertain keywords
  • No system for connecting organic leads with completed sales

In these cases, consider a focused technical review, measurement setup, a limited content test, or optimization of pages that already receive impressions. The objective is to replace assumptions with real evidence before increasing the budget.

If immediate demand capture is more important than building organic visibility, it may also be useful to compare whether to invest in SEO or Google Ads first.

How to Build an SEO Business Case for Your Company

A useful business case should allow another decision-maker to inspect the assumptions, understand the risks, and reproduce the calculations. It should not depend on unexplained traffic promises.

The following sequence keeps the analysis focused on business outcomes:

  1. Define the commercial objective. Specify whether SEO is intended to generate sales, qualified leads, subscriptions, bookings, or another measurable outcome.
  2. Identify addressable search opportunities. Include only topics and queries that match your audience, offer, geography, and ability to create a competitive result.
  3. Estimate qualified organic traffic. Apply realistic ranking and click-through ranges rather than assuming every search becomes a visit.
  4. Apply conversion assumptions. Use data from comparable landing pages, customer segments, or acquisition channels where possible.
  5. Translate conversions into contribution. Account for margins, qualification, close rates, refunds, churn, and repeat-purchase assumptions as relevant.
  6. Model the growth timeline. Show when costs occur and how traffic and revenue could develop during the ramp-up period.
  7. Include every material cost. Add strategy, implementation, content, tools, management, and internal labor.
  8. Build multiple scenarios. Present conservative, expected, and optimistic outcomes using clearly documented assumptions.
  9. Calculate break-even thresholds. State how much traffic, how many conversions, and how much contribution are required to recover the investment.
  10. Define measurement before launch. Document analytics, CRM, attribution, reporting periods, and ownership of data quality.
  11. Set review points. Replace forecast inputs with actual ranking, traffic, conversion, cost, and sales data as evidence becomes available.

Before approving a larger program, validate whether your website has enough relevant search opportunities and whether the required work is realistic. A free SEO opportunity analysis can help identify scalable tasks, visibility opportunities, quick wins, and areas where automation may be suitable.

The final proposal should show the investment level the company can defend even if results take longer or conversion performance falls below the expected case. A good business case does not eliminate uncertainty; it makes uncertainty manageable.

Key Conclusions About SEO Value for Business

The most important conclusions from this framework are:

  • SEO value should be presented as a range based on documented assumptions, not as guaranteed revenue.
  • The core estimate combines qualified organic traffic, conversion rate, and contribution per conversion.
  • Search volume alone is not a reliable measure of financial opportunity.
  • Forecasted value, realized ROI, break-even performance, and attributed revenue are separate calculations.
  • A complete cost model includes content, implementation, tools, management, and internal labor as well as external fees.
  • Ramp-up time must be included so mature monthly performance is not applied unrealistically from the first month.
  • Conservative, expected, and optimistic scenarios make risk visible.
  • Revenue attribution should specify its model, period, and treatment of branded and assisted conversions.
  • Secondary SEO benefits should be reported separately rather than used to inflate direct ROI.
  • When evidence is weak, a smaller validation phase is usually more defensible than a large commitment.

Summary: What Is SEO Worth for My Company?

The answer depends on how much commercially relevant organic traffic your company can realistically earn, how effectively that traffic converts, how much each conversion contributes, how quickly performance develops, and what the complete SEO program costs.

Start with addressable search demand, translate it into a realistic range of qualified visits, apply company-specific conversion economics, adjust for the growth timeline, and subtract all material costs. Then compare the result with your break-even threshold and alternative uses of the same budget.

The final estimate should be a transparent decision model rather than a promise. When its assumptions are documented and updated with actual performance data, it can help your company choose an SEO investment level that is financially credible, measurable, and appropriate for its tolerance for risk.