

Submitting a sitemap to Google Search Console is simple, but a successful submission does not mean every listed page will be indexed. The real objective is to give Google a reliable, accurate list of the canonical URLs you want it to discover. This guide explains how to locate or create that file, submit it correctly, interpret its status and resolve common Google Search Console sitemap errors.
What Is an XML Sitemap?
An XML sitemap is a machine-readable file that lists pages, videos, images or other resources you consider important. Search engines use it as a discovery signal, particularly when a website is large, new, frequently updated or difficult to navigate through internal links.
An XML sitemap is different from a visual HTML sitemap. The XML version is designed primarily for search engines and contains structured URL data. An HTML sitemap is a web page created for visitors, usually presenting links to important sections in a readable layout. One does not replace the other because they serve different audiences.
A well-maintained XML sitemap should normally contain complete, canonical URLs that you want to appear in search results. Google recommends using absolute URLs and including the preferred version of each page rather than every duplicate variation.
Do You Need to Submit a Sitemap to Google?
Not every website strictly needs a sitemap. Google can discover pages by following crawlable internal and external links. A small website with roughly 500 or fewer indexable pages may not require one if every important page is easily reachable from the homepage.
A sitemap becomes more useful under several common conditions:
- Your website has a large number of products, articles, categories or other indexable pages.
- Your website is new and has few external links pointing to it.
- Some important pages are not well connected through internal navigation.
- Your content changes frequently or new URLs are published regularly.
- Your website contains substantial video, image or news content.
- You need a structured way to monitor URL discovery by page type or website section.
Even when Google could discover your pages without one, submitting a clean sitemap provides additional control and diagnostic information. It lets you confirm whether Google can fetch the file and identify processing errors through the Sitemaps report. Google notes, however, that sitemap inclusion does not guarantee crawling or indexing.
How to Find Your Sitemap URL
Many content management and ecommerce platforms generate an XML sitemap automatically. Before creating a new file, check whether one already exists and whether it accurately represents your current indexable content.
You can locate the sitemap using the following process:
- Check common paths on your domain, such as /sitemap.xml and /sitemap_index.xml.
- Open your website’s /robots.txt file and look for a line beginning with Sitemap:.
- Review your CMS, SEO plugin or ecommerce platform settings.
- Ask your developer or hosting provider where the sitemap is generated.
- If no sitemap exists, use your website software to generate one automatically.
When you open the file, you should see XML data containing URL locations or a sitemap index that points to several individual sitemap files. A human-friendly stylesheet may make the file look like a regular page, but the underlying response must still contain valid sitemap data.
What If Your Website Does Not Generate a Sitemap?
A very small, stable website can use a manually created sitemap, but manual maintenance becomes unreliable as the site grows. For more than a few dozen URLs, it is usually better to generate the file directly from the website database or CMS. This reduces the risk of leaving deleted pages in the sitemap or omitting newly published content.
What to Check Before Submitting a Sitemap
Submitting an inaccurate sitemap can create confusing reports without solving discovery problems. Review both the sitemap file and a representative sample of its URLs before adding the sitemap to Google Search Console.
Your pre-submission checklist should include the following points:
- Canonical URLs: Include the preferred version of each page, not duplicate protocol, hostname, parameter or tracking variations.
- Indexable pages: Exclude URLs intentionally marked with a noindex directive.
- Successful responses: Valuable listed pages should normally return an HTTP 200 success response.
- No unnecessary redirects: List the final destination URL instead of an old URL that redirects elsewhere.
- Correct domain and protocol: Ensure that HTTP, HTTPS, www and non-www versions match your chosen canonical structure.
- Absolute addresses: Each entry should contain the complete URL rather than a relative path.
- Crawl access: Confirm that Googlebot is not unintentionally blocked from the sitemap or important pages.
- Valid XML: Check the namespace, encoding, required elements and escaped special characters.
- Accurate modification dates: Use last-modified information only when it reflects a meaningful page update.
- File limits: Keep each sitemap below 50,000 URLs and 50 MB when uncompressed.
These checks separate sitemap quality from page quality. A sitemap can be processed successfully even when some listed pages redirect, return errors or remain non-indexable. Conversely, valid pages may be indexed even if they were discovered through internal links rather than the sitemap.
How to Submit a Sitemap in Google Search Console Step by Step
Before you begin, you need access to the correct property. If the site has not yet been added, follow the instructions to set up and verify Google Search Console first. Google currently requires owner permissions to submit a sitemap through the Sitemaps report.
Once access and the sitemap file are ready, follow these steps:
- Select the correct property. Confirm that you are working with the property covering the sitemap and its listed URLs.
- Open the Sitemaps report. In Google Search Console, find the Sitemaps option under the indexing-related reports.
- Locate the submission field. Find the area labelled Add a new sitemap.
- Enter the sitemap location. Add the requested sitemap path or exact sitemap address shown for the selected property.
- Select Submit. Google will record the request and attempt to fetch the file.
- Review the initial status. Processing may not be immediate, so return to the report if a final result is not yet available.
- Open the submitted row. Review detailed information if the status reports an error or fetch problem.
You are not uploading the XML file into Search Console. The file must already be hosted and publicly accessible on your website. Submission only tells Google where to find it.
How to Read the Submitted Sitemaps Report
The Submitted sitemaps table helps you determine whether Google can retrieve and process your Google Search Console sitemap. It is not a complete page indexing report.
Review the following fields when assessing a submission:
- Sitemap URL: The location submitted through the report or API.
- Type: For example, an individual sitemap, sitemap index, RSS feed or Atom feed.
- Submitted: The date of the most recent submission through Search Console.
- Last read: The latest time Google successfully fetched the sitemap.
- Status: Whether the sitemap was processed successfully or encountered a fetch or parsing problem.
- Discovered pages: The number of page URLs Google identified through the processed sitemap data.
Success means Google fetched and read the sitemap without a reported processing error. It does not mean all discovered URLs have been crawled, indexed or ranked.
Couldn’t fetch means Google could not retrieve the sitemap file. The problem is therefore at the sitemap access level rather than necessarily affecting every page listed inside it.
Has errors or Sitemap had errors means Google could retrieve at least part of the file but encountered one or more processing problems. Valid entries may still be used even when other entries contain errors.
How to Fix Couldn’t Fetch and Sitemap Could Not Be Read Errors
The first diagnostic decision is whether Google failed to retrieve the file or retrieved it but could not parse its contents. These are different failure types and require different checks.
How to Troubleshoot a Couldn’t Fetch Status
If the report says Couldn’t fetch, verify the sitemap’s availability before editing its XML structure.
- Open the exact submitted location and confirm that the file exists.
- Check for a 404, 403, 500 or other non-success response.
- Confirm that no login, firewall, security plugin or access rule blocks Googlebot.
- Review robots.txt for a rule preventing the sitemap from being fetched.
- Check for redirect loops, excessive redirect chains or a redirect to an unrelated location.
- Confirm that the website and hosting server were available when Google attempted the fetch.
- Make sure you submitted the correct filename, path, protocol and hostname.
You can also inspect the sitemap location with the URL Inspection tool and run a live test. In the availability details, check whether crawling is allowed and whether the page fetch is successful. This can reveal a server or access problem that is not visible in a normal browser session.
How to Troubleshoot a Sitemap That Could Not Be Read
If Google can access the file but cannot process it correctly, inspect the format and contents.
- Validate the XML structure and required sitemap namespace.
- Remove leading output, error messages or HTML inserted before the XML declaration.
- Escape special characters appearing within URL values.
- Use complete URLs instead of relative paths.
- Correct hostname, protocol or directory mismatches.
- Remove malformed, empty or unsupported entries.
- Confirm that an individual sitemap does not exceed the size or URL limit.
- Ensure that a sitemap index lists sitemap files rather than other sitemap index files.
- Check compressed files for gzip or decompression errors.
Do not repeatedly resubmit an unchanged broken file. Fix the underlying access or parsing problem, verify the corrected version and then submit it again. Google may retry temporary failures, but persistent critical errors can cause it to stop attempting to process that sitemap.
How to Handle Multiple Sitemaps and Sitemap Index Files
A single sitemap is limited to 50,000 URLs or 50 MB when uncompressed. Larger websites must divide their URLs into smaller files. A sitemap index can then list those individual files, allowing you to submit one central location to Google Search Console.
Even below the technical limit, segmentation can make monitoring easier. Useful divisions may include:
- Products and product categories.
- Articles, guides and news content.
- Images or videos requiring specialized sitemap data.
- Separate countries or language versions.
- Major website sections managed by different systems.
Use segmentation only when it creates practical diagnostic value. Splitting a small website into dozens of files usually adds maintenance without improving discovery.
For example, if product URLs are stored separately from articles, a sharp change in one sitemap’s discovered page count is easier to connect to the relevant template, publishing workflow or canonical configuration. The sitemap structure becomes a monitoring tool rather than merely a list of URLs.
How to Update or Remove a Submitted Sitemap
You do not normally need to submit the sitemap every time a page is published. Once Google has successfully read it, Google can revisit the file periodically. Your CMS should update the existing file automatically when canonical, indexable pages are added, changed or removed.
Use the following process after major structural changes or a corrected sitemap error:
- Update or regenerate the sitemap at its existing location.
- Open the file and confirm that the corrected version is publicly available.
- Test representative URLs and verify the XML structure.
- Resubmit the sitemap if the change is important or follows a persistent failure.
- Monitor the latest read date, status and processing details.
Removing a sitemap from the Search Console report only removes that submission from the report. It does not automatically remove its URLs from Google’s records or search results. If a page should no longer be indexed, apply the appropriate page-level action, such as a permanent redirect, a genuine not-found response or a noindex directive. The correct choice depends on whether the content has moved, been deleted or should remain available to visitors.
Why Sitemap Submission Does Not Guarantee Indexing
A sitemap primarily supports discovery. After discovering a URL, Google still decides whether to crawl it. If crawled, the page must then be processed and evaluated for indexing. These are separate stages, and not every discovered or crawled page reaches the index.
Important pages should be publicly accessible, return a successful response, allow indexing and provide useful indexable content. They should also use consistent canonical signals. Meeting these technical requirements makes a page eligible, but Google explicitly states that indexing is not guaranteed.
If a sitemap has a Success status but valuable pages remain excluded, the next step is not repeated sitemap submission. Use the Page indexing report and URL Inspection tool to identify whether the cause involves crawling, noindex directives, redirects, duplicate pages, canonical selection, server responses or another indexing decision. You can use the focused guide to investigate page indexing issues.
The supplementary application view below demonstrates how sitemap presence and Google Search Console indexing status can be monitored as separate indicators. It is a real SEOAssistant workflow screenshot captured on October 19, 2026, using the apkomfort.pl example.
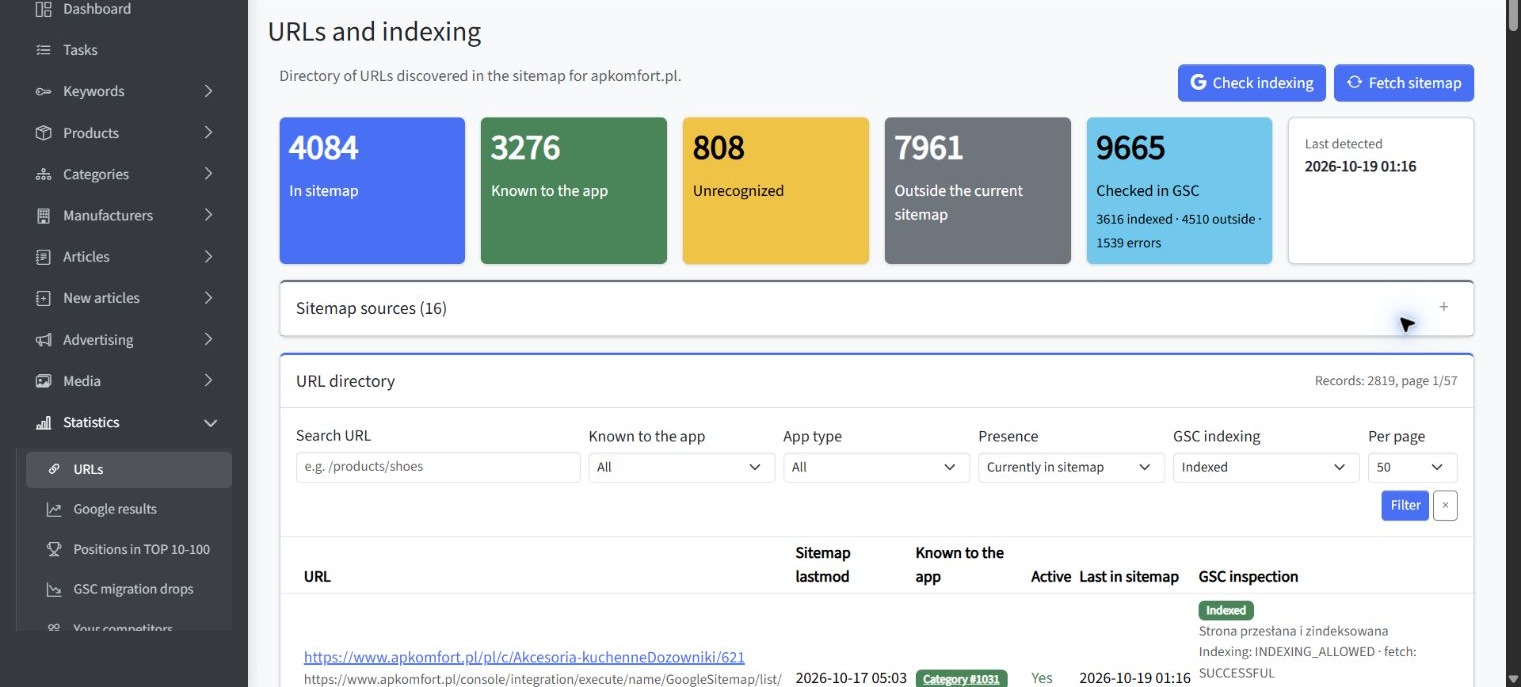
This separation matters because a URL can appear in a sitemap without being indexed, while an indexed URL may have been discovered through internal links rather than the sitemap. Compare the two datasets to find meaningful gaps instead of treating sitemap inclusion as proof of index coverage.
Key Conclusions for Google Search Console Sitemap Management
The most useful conclusions are operational rather than technical. A sitemap should be treated as a controlled inventory of preferred URLs and a diagnostic input, not as an indexing command.
- Use an XML sitemap to help Google discover important canonical URLs.
- Do not confuse an XML sitemap with a visitor-facing HTML sitemap.
- Include URLs that are indexable, canonical and expected to return successful responses.
- Verify the sitemap before submitting it through the Sitemaps report.
- Treat Couldn’t fetch as an access problem and reading errors as format or content problems.
- Use sitemap index files when size limits or useful website segmentation require multiple files.
- Do not repeatedly submit an unchanged sitemap to force crawling.
- Use indexing reports for page-level problems because sitemap success is not an indexing result.
- Maintain strong internal links even when every important URL appears in a sitemap.
Summary: Add a Sitemap to Google Search Console with the Right Expectations
To submit an XML sitemap to Google, first locate or generate a valid file containing the canonical pages you want search engines to discover. Check its accessibility, URL quality, XML structure and size. Then select the correct property in Search Console, open the Sitemaps report, enter the sitemap location and review its processing status.
A Success status confirms that Google could process the file. It does not confirm that every URL is indexed or eligible to rank. If the sitemap works but pages remain absent from search, move the investigation from sitemap processing to crawling, canonicalization, content and indexing signals. For a broader view of the platform and its reports, review the complete Google Search Console guide.